Hedgehog Slice (5 ingredients)
on Jun 06, 2021, Updated Nov 23, 2022
This post may contain affiliate links. Please read my disclosure for more info.
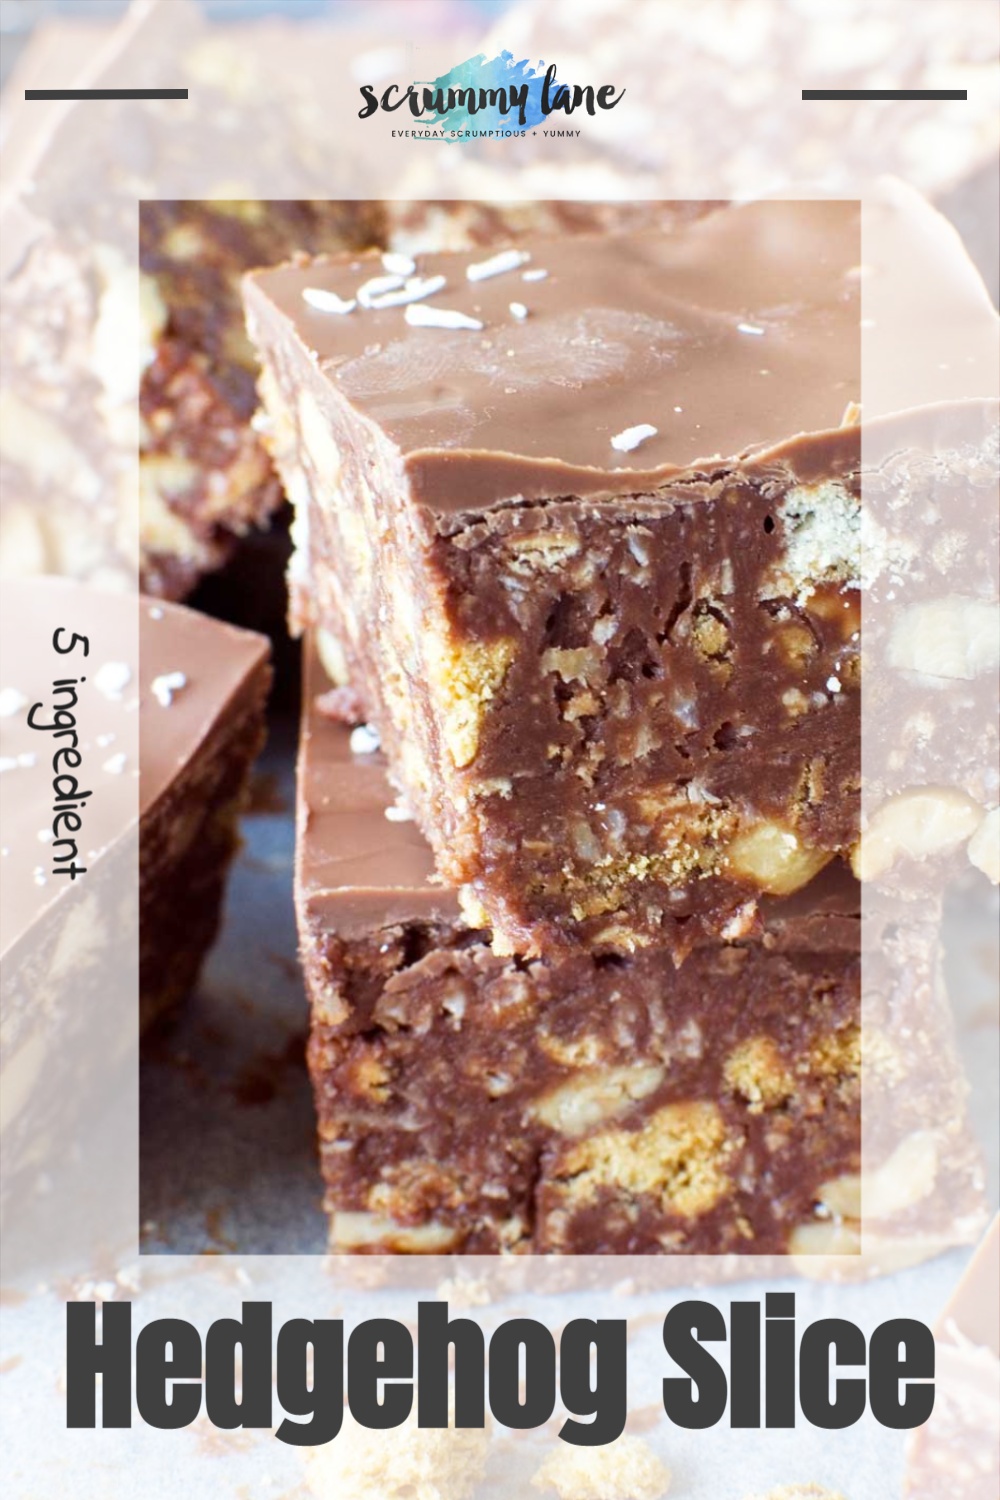
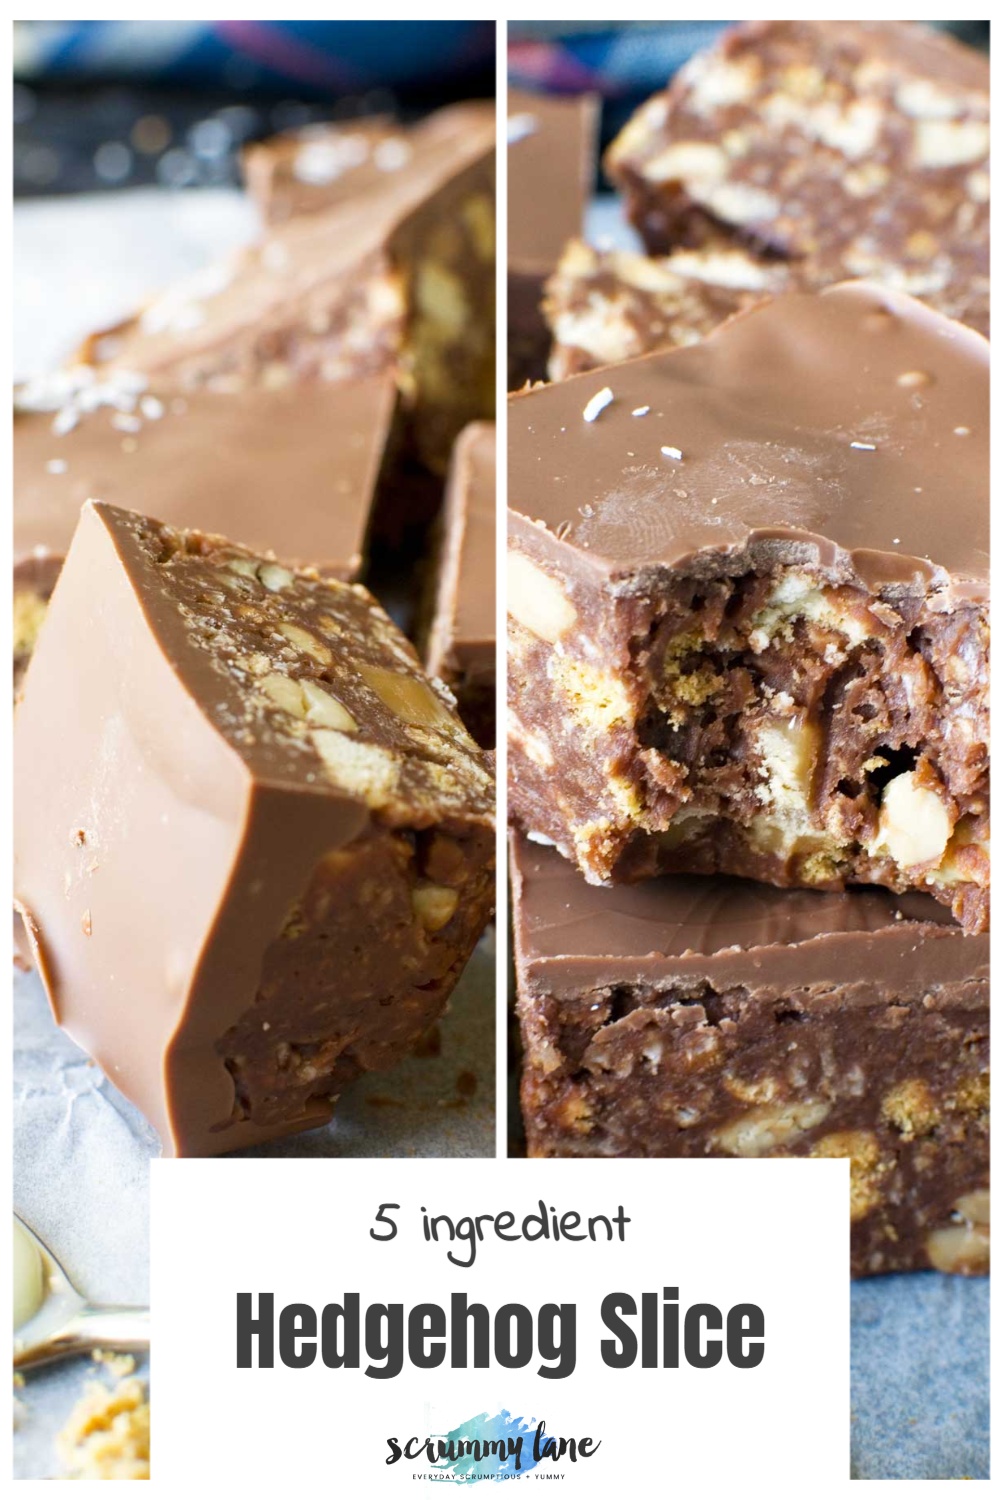
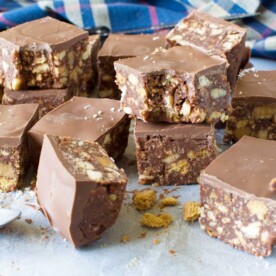
Need a mouthwatering treat for your next party, picnic, or ’emergency’ chocolate snack? Look no further than this hedgehog slice recipe! This popular no bake slice is made with just 5 main ingredients – condensed milk, butter, chocolate, crushed biscuits, and coconut – and in around just 20 minutes. It’s fudgy, gooey, biscuit-y, crunchy, and ridiculously easy to make!
What’s hedgehog slice?
Hedgehog slice is one of Australia’s most popular sweet treats. It’s very similar to chocolate fridge cake or Tiffin in the UK.
I know what you’re thinking. I’m not sure I’m interested in a sweet treat named after an animal – a prickly one at that.
In fact it’s more than a little baffling why this is called a hedge hog slice at all, since hedgehogs aren’t even found in Australia. Maybe the inside very slightly resembles the bristles of a hedgehog? Or maybe not. But you have to admit it’s a cute name for a yummy sweet treat!
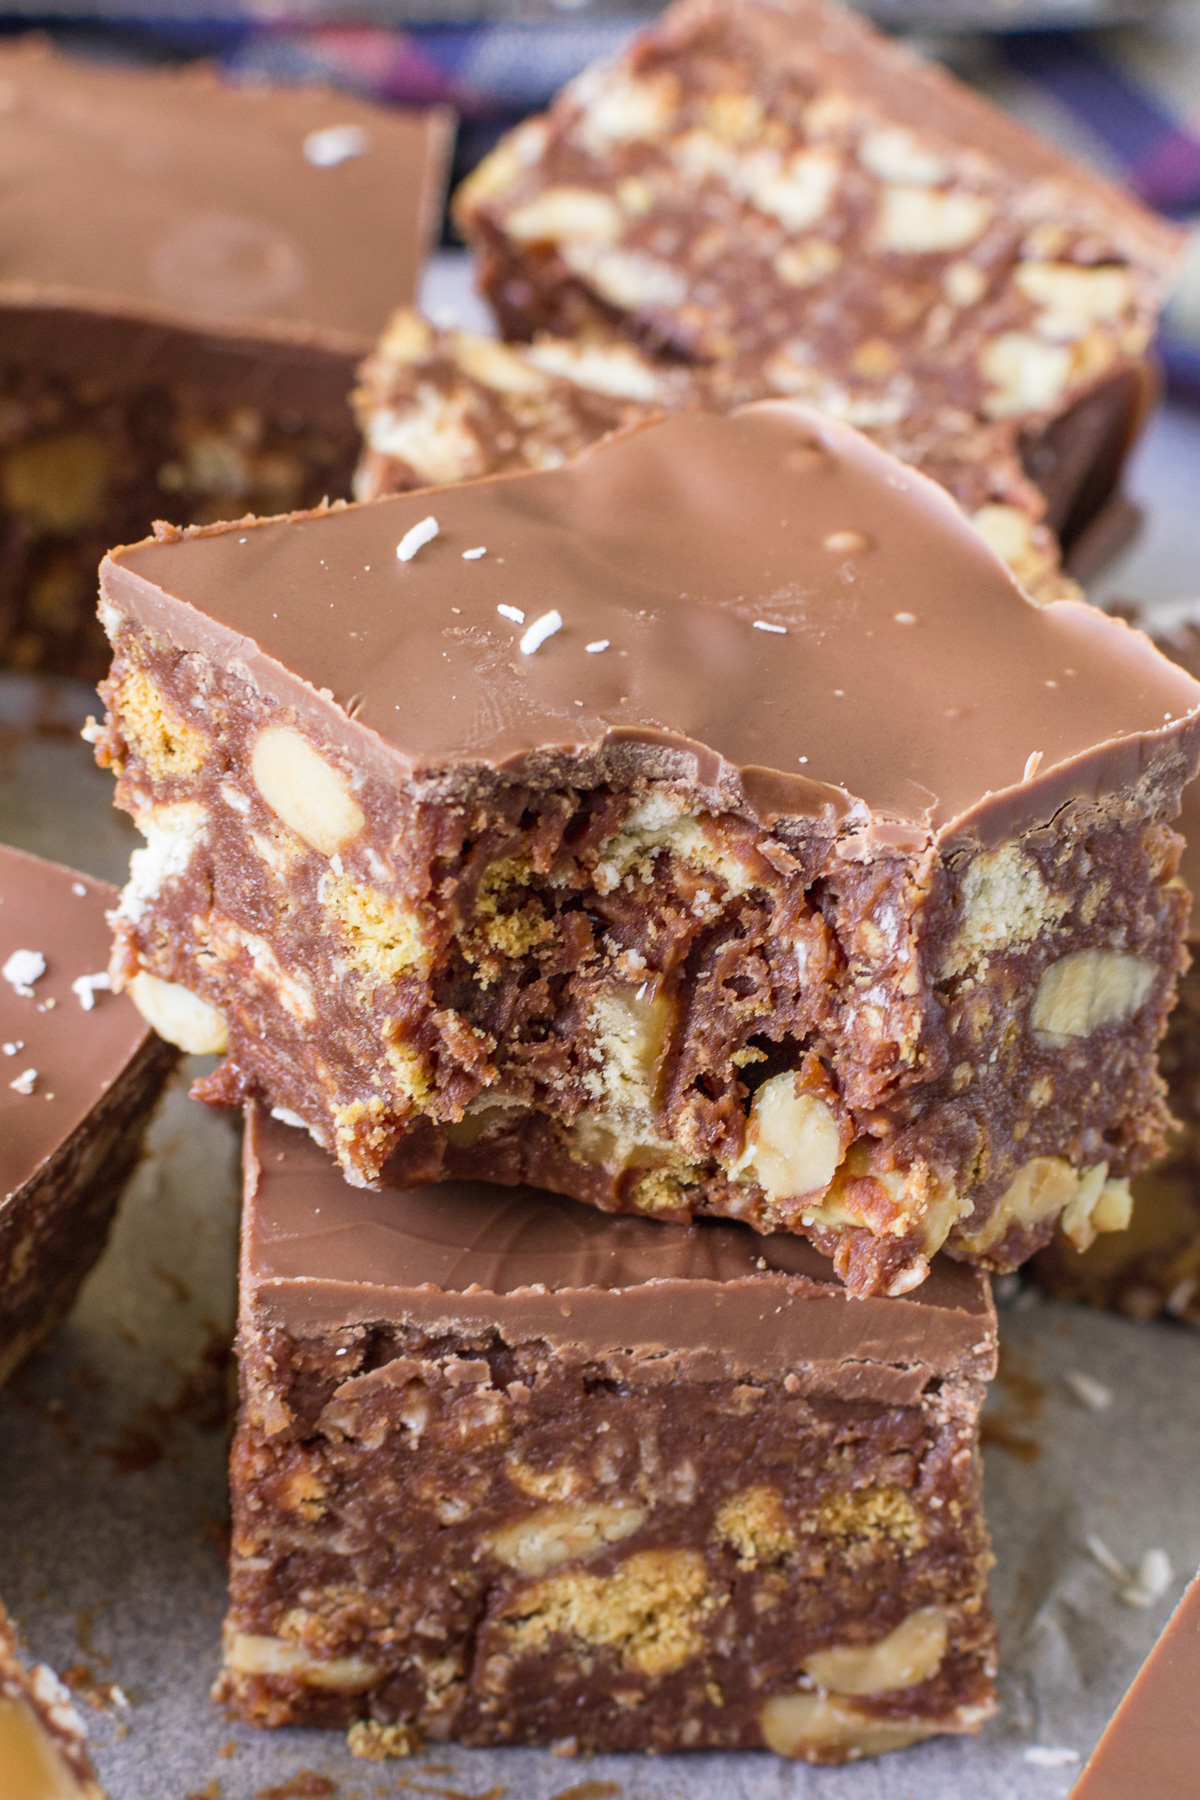
More importantly, what does it taste like? I think you could describe it as a soft, gooey and fudgy no bake brownie… with just a little bit of crunch. I’m making your mouth water already, right?
So put your doubts aside because this easy chocolate slice recipe has got so many good things going for it!
Reasons to give hedgehog slice a try:
- As well as being no bake, it’s an ‘almost’ one bowl recipe. It’s perfect for those times when you don’t want to turn on the oven but you still ‘need’ a yummy chocolaty treat.
- You only need 5 very simple main ingredients to make it. Mix-ins are optional!
- Make ahead and store in the fridge until needed.
- An ideal no-bake chocolate dessert for parties, BBQs, picnics, afternoon tea, cake stalls and more. It’s an absolute crowd pleaser. Who doesn’t like gooey, fudgy, biscuit-y chocolaty things?
- It’s very customizable. Stick to the 5 main ingredients, or add nuts, dried fruit, Rice Krispies (Rice Bubbles), fudge, caramel or whichever mix-ins you like (scroll down for loads more ideas!).
What’s in it?
Biscuits: Let’s get one thing straight here. For my US readers, we’re not talking about the biscuits you know and love. For the purposes of making this slice, biscuits are cookies. Arguably of the fairly boring variety!
I’ve experimented with different kinds of biscuits and ultimately prefer a mixture of plain biscuits such as Arnott’s Marie or Arrowroot (Australia) and Digestive biscuits. If you’re in the UK you can use Rich Tea or Malted Milk biscuits. In the USA use any plain sweet cookies and/or Graham Crackers.
I’ve even added in some salty pretzels before! I thought that worked very well although using all pretzels made the slices a bit too salty for my liking.
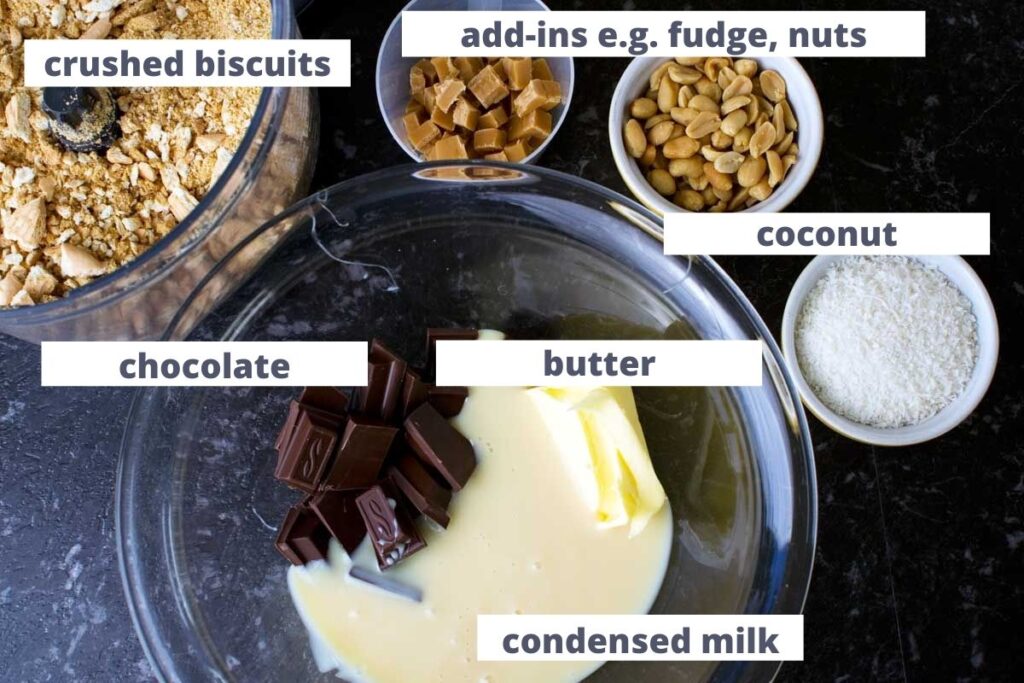
Chocolate: You need a whole 200 gram (7 ounce) bar for the cake mixture, and another to spread over the top. I usually go for dark chocolate in the cake mixture, and milk chocolate on top, but it’s up to you. You can even swirl some white chocolate through the topping if you like, or use a bar of mint chocolate instead.
Sweetened condensed milk: You could say this is the ‘magic’ ingredient. All ready in a can, you just pour it into the big bowl with chocolate and butter to melt into a very yummy, gooey, caramel-y mixture. This is what will bind everything together.
It’s best to use full fat sweetened condensed milk and not a ‘light’ version.
Liking this idea? These ‘magic’ 7 layer bars are another truly scrumptious no bake condensed milk slice recipe for you to try 😉
Butter: All the best gooey chocolaty things need a yummy buttery flavour, right? I like to use salted butter for added flavour, but any good quality butter works.
Coconut: Just ordinary dessicated coconut. I’ve tried making hedgehog slice without coconut and it just doesn’t taste right to me. Of course if there’s someone who can’t eat or doesn’t like coconut skip it and replace with something else. How about Rice Krispies/Rice Bubbles or another kind of cereal?
Mix-ins: Speaking of Rice Krispies… this is a pretty versatile recipe, so feel free to add cereal, nuts, dried fruit – or naughtier things! In the photo above you’ll see I usually add half a cup of salted peanuts and sometimes chopped fudge or caramel to my slice mixture. More about the different add-in options later…
How to make it
The step-by-step guide below should help you make the recipe perfectly first time. Scroll down to the end for the full recipe including ingredient amounts.
Recipe prep: The first thing to do is crush the biscuits. If you have a food processor, just throw them in and pulse them for a few seconds. If not, no worries. Just put them in a Ziploc style bag and hit the bag with a rolling pin until you have crumbs. The food processor option is a bit faster but I know which way is more fun!
I actually prefer to have some big chunks of biscuit in my mixture so that there’s plenty of crunch in the finished bars.
At this point you can also line and grease an 8-inch square baking pan with baking paper. Or equivalent – use a similar-sized round pan and cut the cake into slim wedges if you prefer.
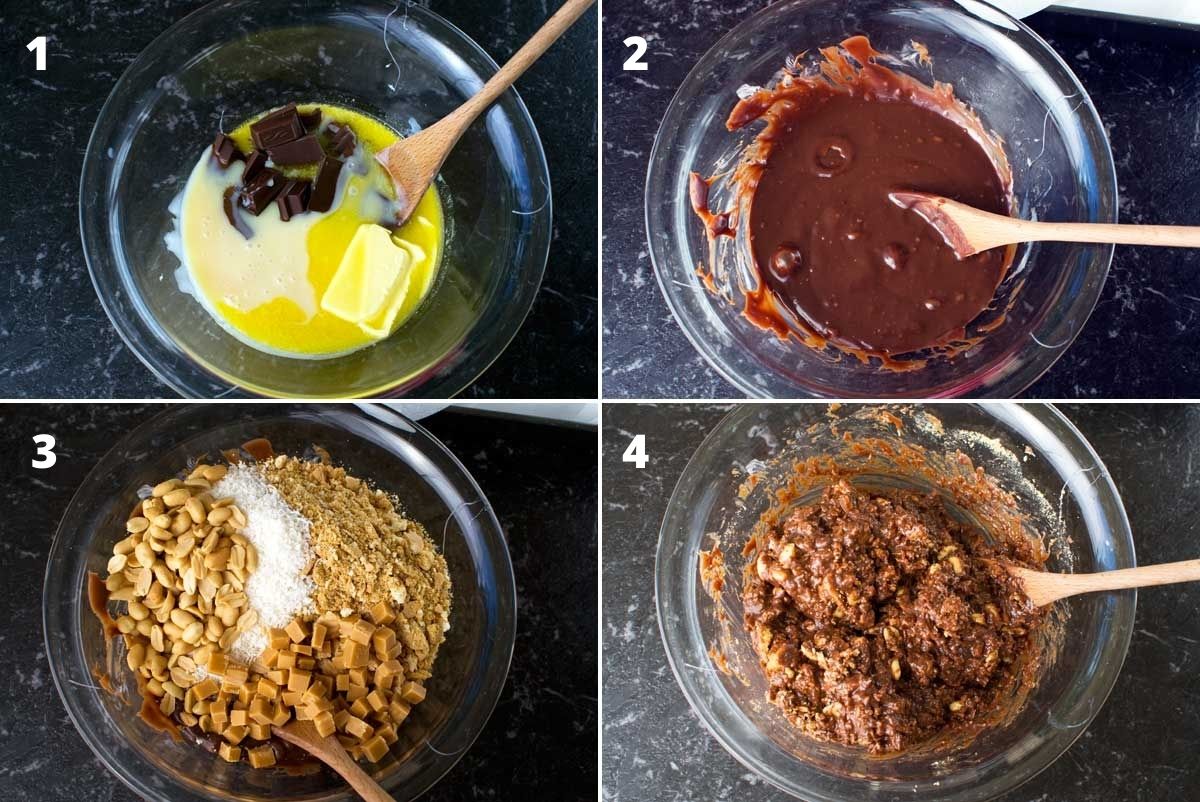
Steps 1 and 2: Once you have your biscuits all crushed up, grab a large mixing bowl. Throw in the broken up chocolate and butter and pour in the condensed milk. Microwave for 1.5 to 2 minutes. I usually stir the mixture half way through and then again at the end when everything’s melted (or almost – the heat will melt any remaining bits of solid butter and chocolate).
Steps 3 and 4: Here comes the fun part. Throw the biscuits, coconut, and anything else you’d like to add into the gooey melted chocolate mixture. Then mix really well with a wooden spoon until everything is coated in the mixture. You can see from photo 3 above that I sometimes add peanuts and something else like chopped fudge – just for some extra crunch and texture.
Work fairly quickly while the chocolate mixture is still warm and easy to stir.
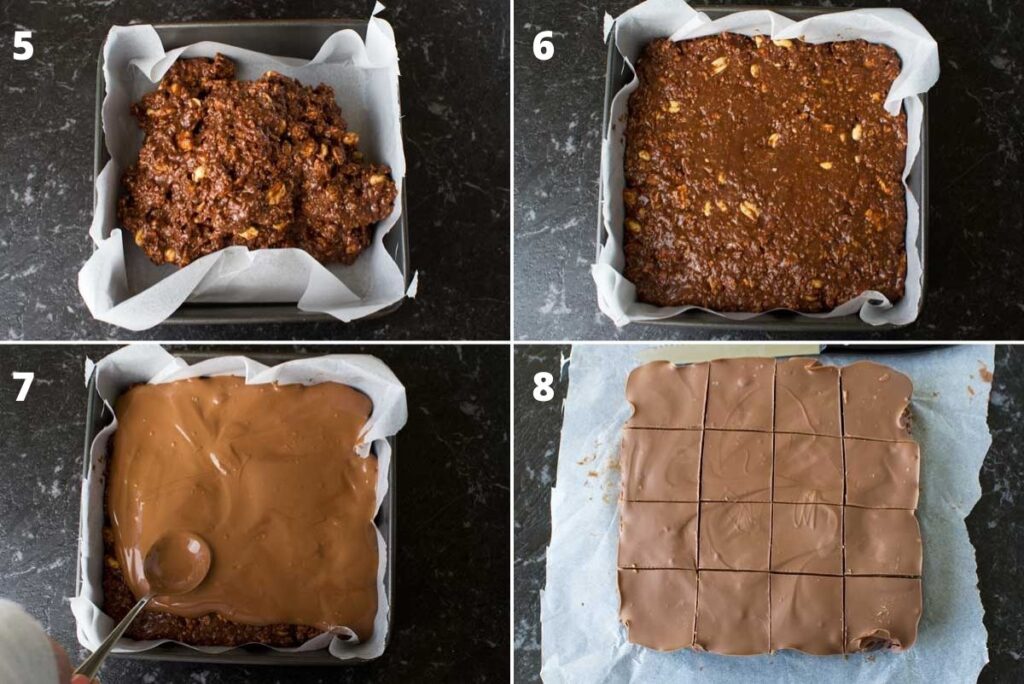
Steps 5 and 6: Empty the mixture into the lined baking tin. Then smooth down with the back of a metal spoon. I find it helps to wet the spoon first so that the mixture doesn’t stick.
Pop the tin into the fridge or freezer for a few minutes while you melt the chocolate for the top.
Step 7: Melt the second bar of chocolate (whichever kind you like – this time I used milk) in the microwave in 30-second bursts. I find 1.5 minutes is usually about right, then I stir to let the heat melt any remaining solid chunks.
Pour the melted chocolate all over the cake, spreading it evenly with a spoon.
Step 8: Cover the pan with plastic wrap or foil and let harden in the fridge (or freezer if you want to eat it sooner!). I like the cake to be really chewy so I store it in the fridge for at least a few hours before serving.
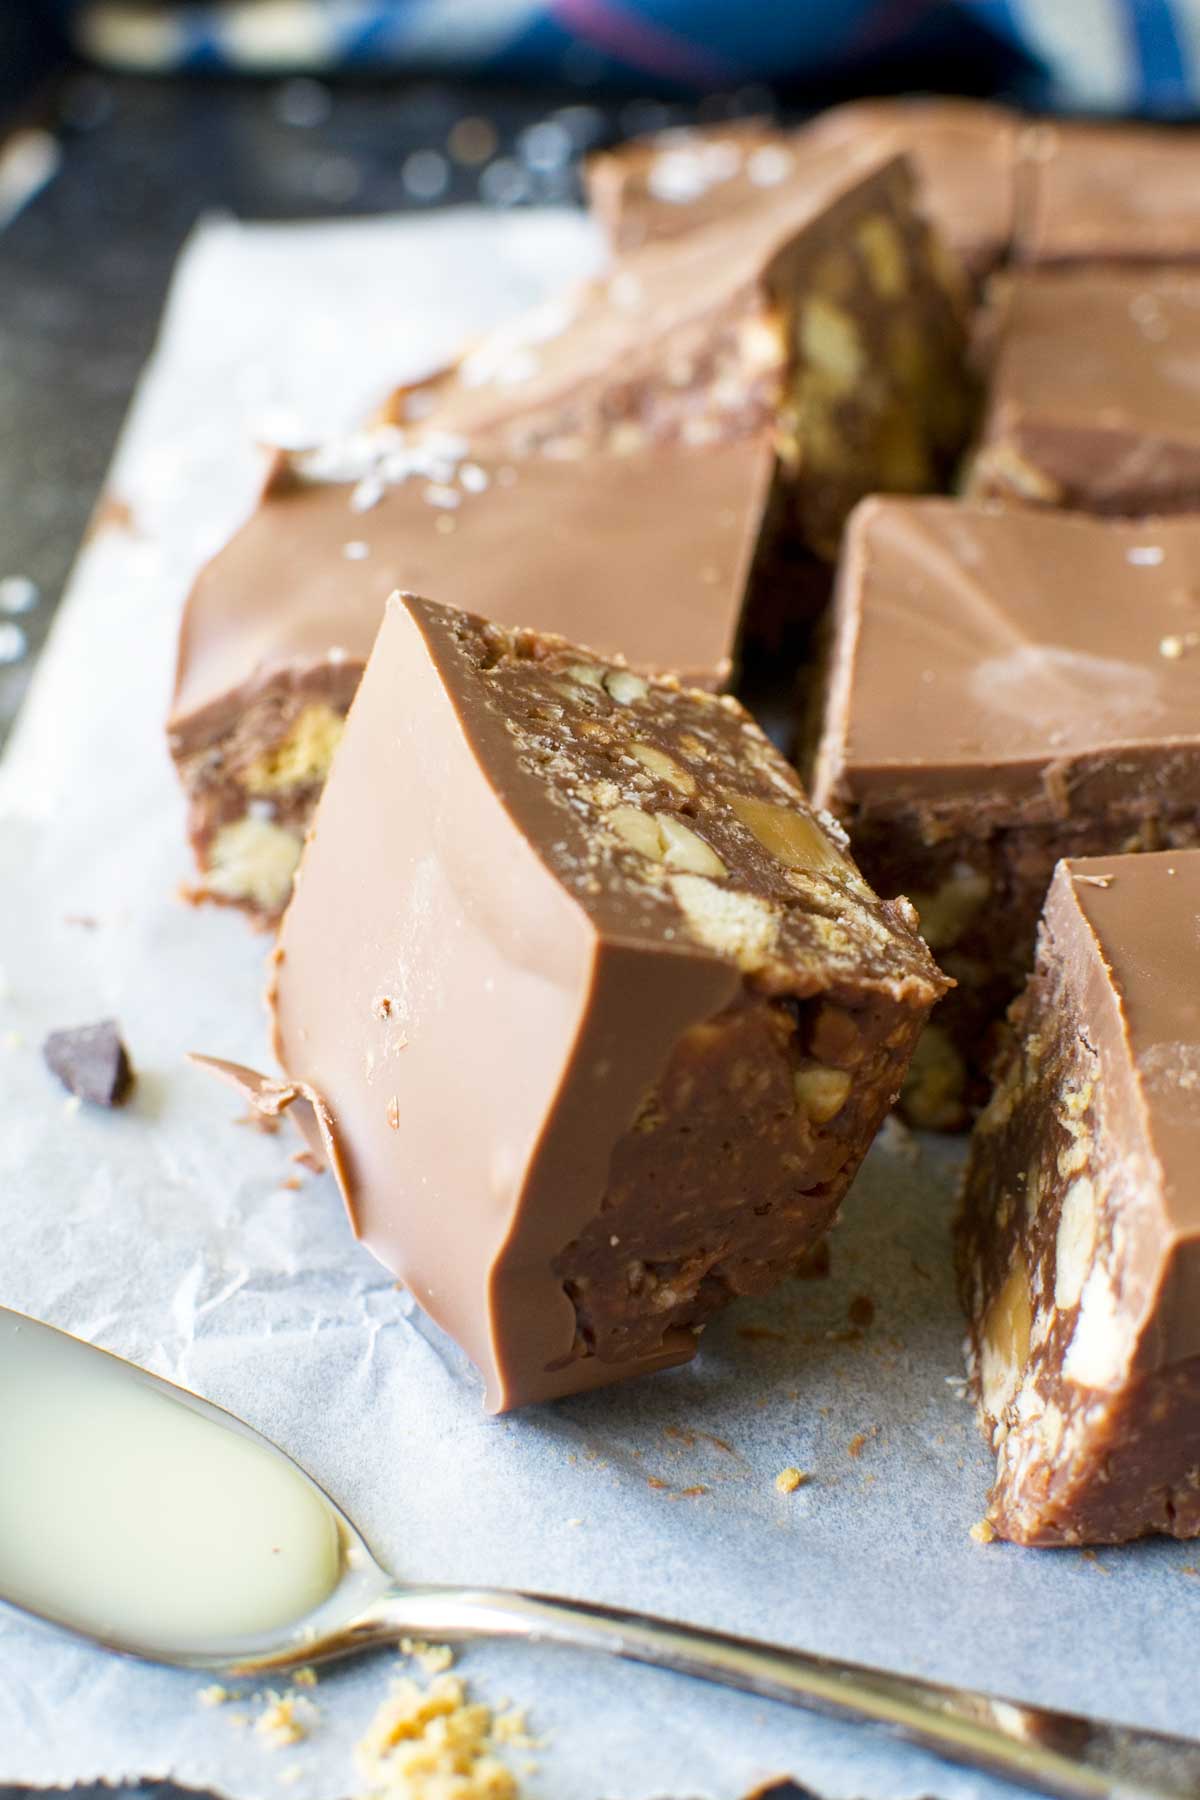
When ready to serve, cut into 16 equal squares. The cake is quite rich, so cut the squares even smaller if you like ;-).
Helen’s Top Tips
- Save on the washing up by tipping the biscuits and other add-ins straight into the chocolate mixture. If you pour the mixture over the add-ins you’ll have to dirty another bowl!
- Keep the biscuits chunkier for more biscuit-y crunch.
- Work fairly quickly while the chocolate mixture is still warm and easy to stir.
- Experiment with different mix-ins, biscuits and chocolate. See below for ideas!
- It’s quite rich so cut it into really small pieces. Or at least think about it 😉
Ways to vary it
The basic recipe for hedgehog slice contains just 5 ingredients: biscuits, chocolate, butter, condensed milk and coconut.
But why stop there? I usually add half a cup to a cup of salted peanuts for extra crunch and a bit of salt. I also sometimes chop up bits of fudge or caramel and throw those in too.
Here are some other ways to vary your hedgehog slice and make it completely your own:
- Instead of peanuts, add cereal. For example: Rice Krispies/Rice Bubbles, Cheerios or Cornflakes. Bear in mind though that these cereals and similar may not be as crispy after a couple of days.
- Replace the peanuts with a different kind of nut, or a mixture e.g. pistachios for a pop of green, flaked almonds or hazelnuts. On the other hand if you’re wondering if hedgehog slice can be made without nuts, the answer is a big yes. Just skip altogether or replace with dried fruit, more coconut or cereal.
- Throw in a third to a half a cup of chopped dried fruit. Sultanas, cranberries or apricots would all work well.
- Stir about a quarter cup of peanut butter into the condensed milk and chocolate mixture. Or swirl a little peanut butter into the melted chocolate for the top. Alternatively add a couple of teaspoons of instant coffee for something more resembling an espresso slice.
- Experiment with different types of chocolate topping – mint, orange, caramel or whatever you can find where you live. You can also melt different colour chocolates together e.g. dark and white, milk and green (mint), then lightly swirl them together before pouring over the slice.
- Experiment with different types of biscuits/cookies. ANY work. I’ve even added pretzels before, but usually together with something else. Otherwise your bars might be a little too salty!
- Sprinkle something pretty over the top before the chocolate sets – M&Ms, sprinkles, caramel chips, crushed nuts, more coconut, or whatever you like. Do this and they’ll be the first thing to disappear at the party!
This hedgehog recipe is very forgiving. The amounts don’t have to be exact. Just throw in what you like the idea of and you’re sure to create something delicious!
Give it as a gift
It occurred to me one time when I was eating this that chocolate hedgehog slice would make a perfect gift.
Why? It actually tastes pretty similar to fudge – but loaded with lots of goodies!
You could just package up small squares in a nice gift bag or box. Alternatively, you could cut it into smaller slices and put it in a see-through gift bag. Tie it up at the top with a nice ribbon or string.
Take a look at the way I packaged these chocolate covered rice krispie bars (also delicious and easy to make!) to ‘see’ what I mean.
More things to know (FAQs)
You can keep it in an airtight container just on the counter and it will be on the softer side. But it won’t spoil. If like me though you prefer a chewier chocolate slice, keep it in the fridge. Either put it in an airtight container or just keep it in the tin you made it in covered with plastic wrap (cling film) or foil.
Longer than you might think – so it’s perfect for making ahead for parties and events! Hedgehog slice keeps really well for up to a week. But honestly, I’ve kept it for much longer than that in the fridge and it’s still tasted really good. Just one thing to note: if you put any kind of cereal in your slices you’ll find they only stay crispy for a few days.
The most common biscuits to use to make this is Arnott’s Marie biscuits – if you’re in Australia, that is. But if you can’t get those, no worries! You can use any plain biscuits like Arrowroot (also Australia), Rich Tea (UK), Malted Milk (UK), Digestives, Graham crackers (USA) or others.
To be honest, the type of biscuit you use is only limited by your imagination. Why not experiment with Tim Tams, Pretzels, wafers, biscuits with flavoured fillings or crumbly oat biscuits? Often I don’t stick to one type of biscuit – in the photos above you may be able to see that there’s a combination of plain biscuits and Digestives.
Actually, yes! If you prefer not to use condensed milk, or don’t have any, this is what you can do: double the amount of butter and add around 3 tablespoons of golden syrup (or use corn syrup instead in the USA). The texture of your slice won’t be quite as fudgy but it will still be very yummy.
Yes. Simply wrap well and store in freezer bags. Alternatively layer up in plastic or glass containers with baking paper between the layers. Freeze for up to 3 months.
More easy chocolate slice recipes
- This no bake caramel slice recipe is another 5-ingredient, no bake version of a popular chocolate dessert. Also perfect for picnics, BBQs and more!
- Strawberry brownies! These are fudgy and gooey, low(ish) in sugar and ready in 30 minutes.
- Blondies made with biscoff spread (and white chocolate – amazing!)
- These peanut butter cornflake treats or these peanut butter cheerio bars are two other simple no-bake slices that never disappoint. And they’re not just for kids! Prefer no peanut butter? Try chocolate dipped rice krispie bars!
- 7 layer bars! (AKA magic bars!) Another delicious and super easy chocolate slice made with condensed milk.
- This white chocolate tiffin (fridge cake) combines all you love about a no bake chocolate slice with the fruity flavors of summer. Enjoy!
Hedgehog Slice
Ingredients
- 200 grams/7 ounces biscuits, crushed, Around 2.5 cups (biscuits = cookies / Pulse in a food processor to crush quickly, or put inside a sealed bag and bash with a rolling pin.)
- 50 grams/¼ cup butter, (half a stick)
- 200 grams/7 ounces dark chocolate, broken into pieces
- 295 grams/1¼ cups sweetened condensed milk
- ½ cup/1¾ ounces desiccated coconut
- ½ cup/4½ ounces peanuts, Optional. Add more if you like (up to a cup), or different types of nuts.
- chopped dried fruit, Rice Bubbles/Krispies, fudge pieces etc. (optional), ⅓ to ½ cup
For the topping
- 200 grams/7 ounces milk chocolate, (or dark)
Instructions
- Line an 8 x 8 inch baking tin/pan or similar with baking paper, grease lightly with butter, and set aside.
- Crush the biscuits in a food processor. Some small and larger chunks are OK. Alternatively, put biscuits in a sealed bag and hit with a rolling pin.200 grams/7 ounces biscuits, crushed
- Put the butter, chocolate and condensed milk in a large mixing bowl. Microwave for 1.5 to 2 minutes in 30-second bursts to melt. Stir half way through and at the end.50 grams/¼ cup butter, 200 grams/7 ounces dark chocolate, 295 grams/1¼ cups sweetened condensed milk
- Add the crushed biscuits, coconut, peanuts and any other add-ins to the chocolate mixture in the bowl. Stir well with a wooden spoon until everything is coated in the mixture.½ cup/1¾ ounces desiccated coconut, ½ cup/4½ ounces peanuts, chopped dried fruit, Rice Bubbles/Krispies, fudge pieces etc. (optional)
- Empty the mixture into the prepared tin. Flatten and smooth with the back of a metal spoon (Wet the spoon beforehand to prevent sticking). Refrigerate while you prepare the topping.
- Melt the chocolate for the topping in a medium jug or bowl in the microwave in 30-second bursts (1.5 minutes is usually about right). Stir well until all the chocolate is melted.200 grams/7 ounces milk chocolate
- Pour the chocolate over the top of the cake and smooth with a metal spoon. Cover well with plastic wrap (cling film) or foil and let harden for at least an hour or preferably a few hours in the refrigerator. Pop in the freezer if you want to eat it sooner.
- Cut into at least 16 squares to serve. Store in a sealed or well covered container in the fridge for up to a week.


This is just the same as my grandma made when I was a kid. Growing up without a parents are really hard for a kids but for me is diffident because I am contented with the loved of my grandma.
Hello Blitzo! I’m so happy this reminds you of your relationship with your grandma. Thank you for your review!
I make this recipe all the time. Love how quick it is to throw together. Tastes like chocolate truffles but better
Hello Lauren, and thank you so much for the great review. I love your description of chocolate truffles but better! Do you like caramel slice, too? I just published a super easy version of that too if you’d like to check it out! 🙂
Why does it not use the full tin of condensed milk?
Hello Dianne! I guess the recipe doesn’t quite need that much of the milk, but it does seem to freeze quite well so what I usually do is just pop it in the freezer for next time. Or I use the remainder to make this recipe: https://scrummylane.com/15-minute-skillet-chicken-with-pesto-parmesan-sauce/ Enjoy!
This has brought back memories of my childhood 65+ years ago. We live in New Zealand. My mum regularly made “Hedgehog”. Butter, sugar, 1 beaten egg, cocoa, vanilla ess. Cooked all in a saucepan, added broken vanilla wine biscuits, optional were walnuts. When set in sponge roll tin, cut into squares AND each piece rolled in icing sugar. YUMMEEEE! In my 70’s now I don’t make this anymore. But, you know what, we are in Covid Lockdown, I might just make some for old times sake.
Carolyn
Hello Carolyn! Aw, this is such a lovely message to read! Thank you! Your mum’s version of the recipe sounds very much like the ‘chocolate biscuit cake’ I grew up with in England. I loved that too (and so does Prince William, apparently!). I really hope you enjoyed this modern-day version with the condensed milk. I must admit I’m a little squeamish about raw egg in no-bake recipes these days, hence the condensed milk instead. I really hope you enjoy it as much as you used to as a child. Best wishes, and I have my fingers crossed for you that the end of the lockdown will come into sight soon. It must be so hard for you all.
Hi Helen, the egg is actually cooked in the chocolate sauce mixture that the broken biscuits are mixed into.
Ahhh… I never thought of that! A bit like when you make carbonara and the hot pasta cooks the egg. Well that has made me feel a lot better about raw eggs in desserts now. Thanks Carolyn! 🙂
This deserves a 5 star rating
Thank you, Christine! Did you make it?
This is just the same as my mum made when I was a kid growing up. I loved this slice then and I love it now.
So happy to hear this, Christine. It was a good one in the past and it’s still a good one now. I love all the different ways you can jazz it up, and I think it makes great gifts, too. 🙂
Loved this recipe, tweaked it a bit by using 150grams of chocolate & a knob of butter for the topping to make it easer to slice.
Ooh yes that works too, Sally. Thank you so much for the feedback! It’s a bit nail-biting getting feedback on such a classic, but thumbs up from most so far. 🙂