Chocolate Lollipops
on Jul 09, 2021, Updated Oct 18, 2021
This post may contain affiliate links. Please read my disclosure for more info.
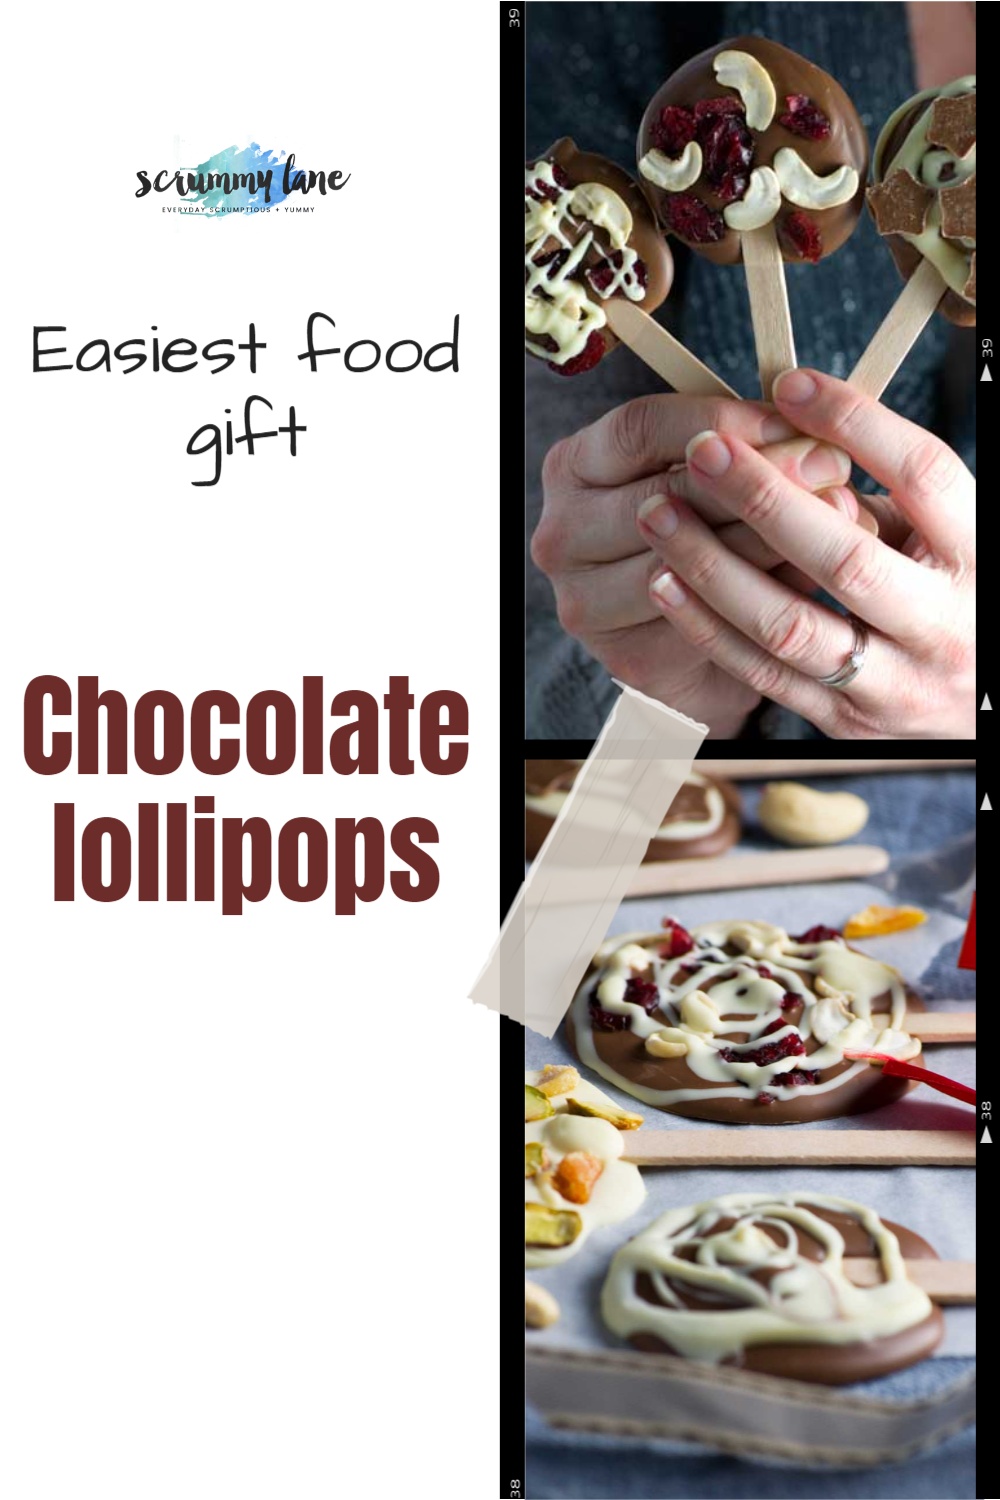
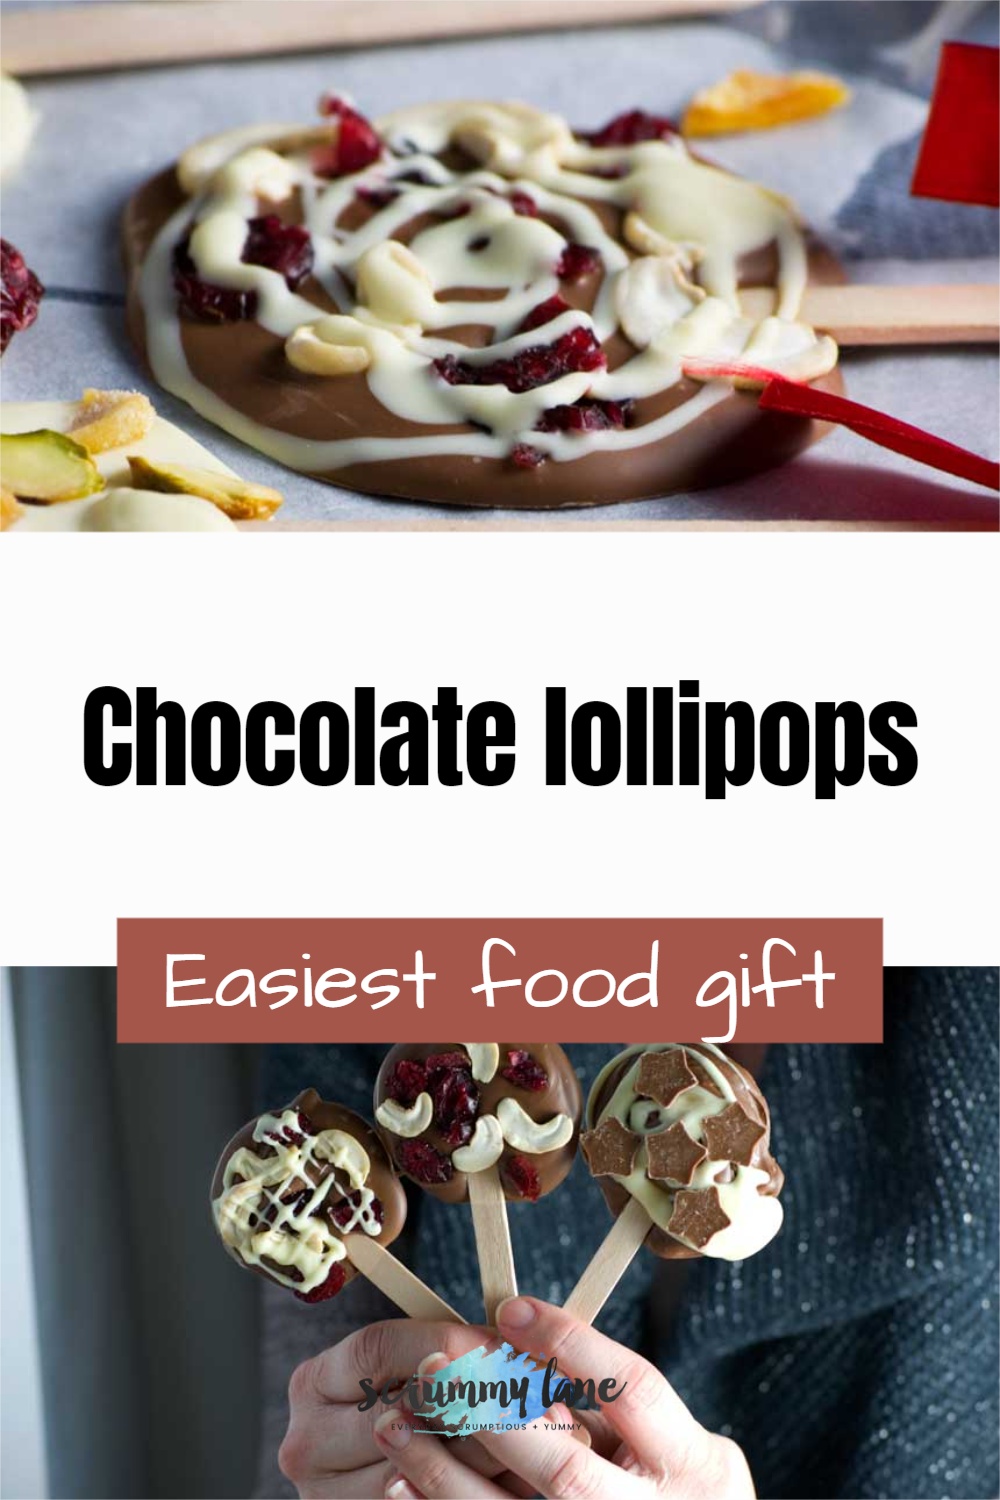
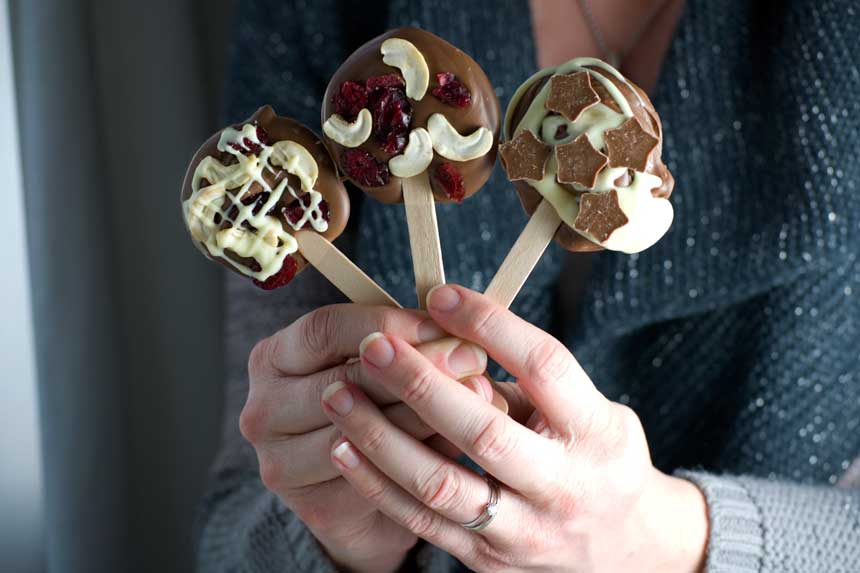
These beautiful chocolate lollipops are just perfect last-minute stocking fillers for your loved ones. Personalize them, package them up with a pretty bow, and you’ve got an economical, cheerful and yet classy little gift. No chocolate molds necessary!
Homemade food gifts are such a great option for Christmas or birthday gifts, end-of-term gifts for teachers or a gift for a dinner party host. The best part? They’re usually ridiculously easy to make! Favourites include these dried orange slices or chocolate candy orange slices (you HAVE to try both of these!) or a freshly baked pan of these cinnamon scrolls.
I spotted these chocolate lollipops on a re-run of the Barefoot Contessa on the food channel. The lovely Ina Garten was visiting a chocolate maker in London who showed her how to make these wonderfully simple chocolate treats.
Incidentally, Ina Garten used to be a nuclear analyst at the White House – so we must be in good hands here, folks!
Why you’re going to love them
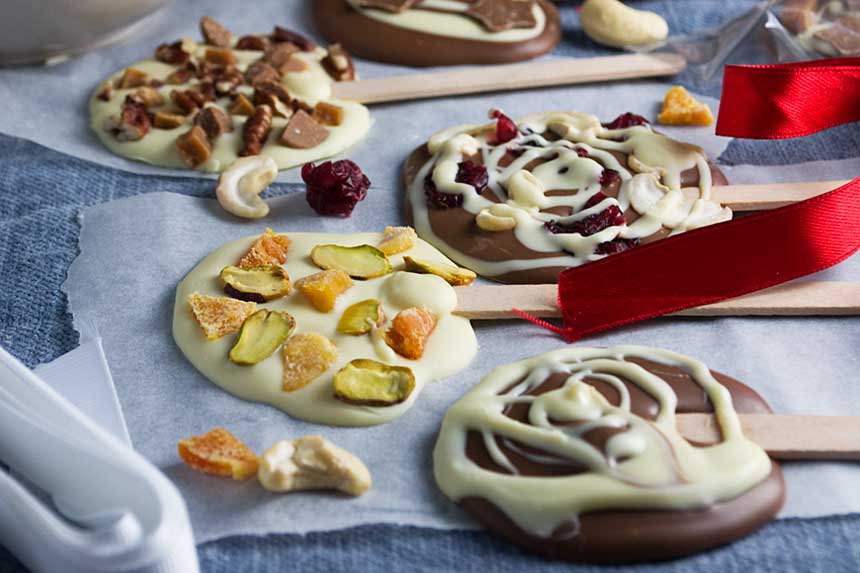
- Make a lot in a short amount of time. All you have to do is spoon tablespoonfuls of chocolate onto baking or non-stick paper, push a little stick into the chocolate, then decorate with treats of your choice. Very easy, but economical too.
- Perfect for both kids and adults. You can decorate with candy for kids (or big kids!), fruit and nuts for a more refined version, or a mixture of both according to what you know different people might like.
- They look classy and professional. Making them look pretty is easy. Any odd bits of material or paper ribbon will work just fine.
What you need (ingredients and equipment)
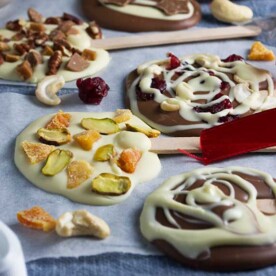
Chocolate: Literally any kind! I like to use a variety including milk, white, dark and different kinds of chocolate bars/candy bars to chop up and sprinkle over the lollipops. A big 200 gram/7 ounce bar will make you around 12 small lollipops.
White chocolate: This part is optional, but I think that a bit of white chocolate drizzles over the lollipops looks great.
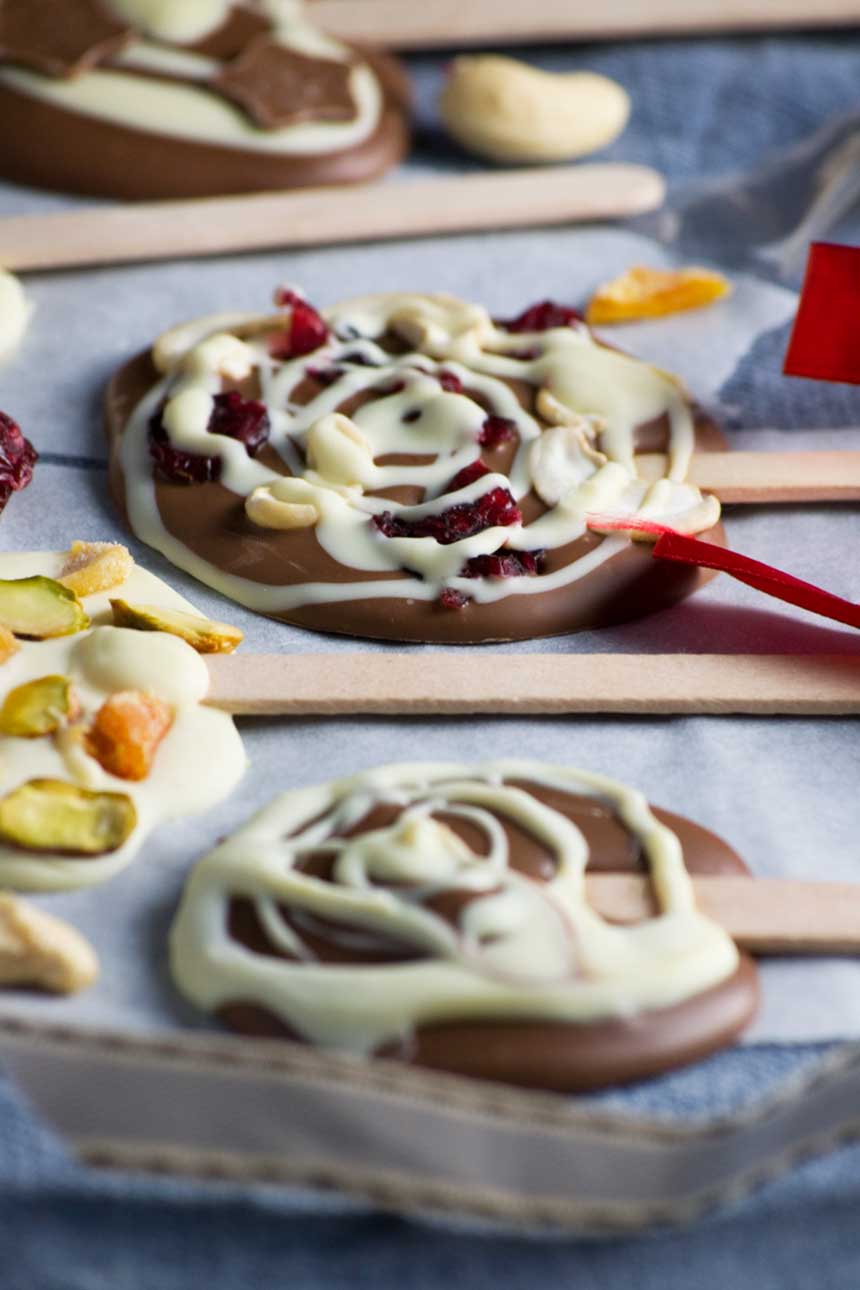
Decorations: Here’s the part where you’re only limited by your imagination! While the chocolate is still wet, sprinkle over chopped dried mango, chopped dried orange slices or candied oranges, other dried fruit, raw cashew nuts, pistachio nuts, chopped fudge, pecans, chopped candies / candy bars – the list goes on!
In the photo below you can see that I sprinkled over little star-shaped chocolates (from the UK!) and some small cubes of fudge chopped from bigger pieces.
How to make them
Step 1: The very first step is to line baking trays with baking paper.
Step 2: Then break the chocolate(s) into pieces in small glass / ceramic bowls and melt in the microwave in 30-second bursts. Only melt the chocolate until it’s almost completely melted, then stir the chocolate until the rest is melted. This is the easiest way of tempering it so it sets properly again.
Step 3: Place tablespoons of melted chocolate on the baking / non-stick paper, then push a lollipop stick about a third of the way into the side of it.
Step 4: Quickly decorate with your chosen treats, then leave to harden completely.
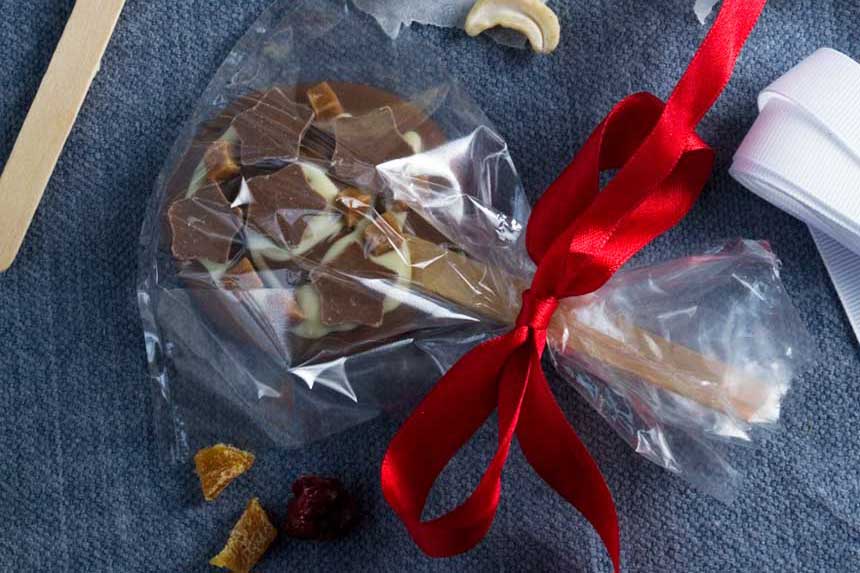
Step 5: Wrap each lollipop in a cellophane gift bag, and tie with a ribbon. No one will believe that they aren’t store-bought!
Pro tip: Get organised with all your little bowls of decorating treats at the ready. You want to be able to spoon your chocolate out onto your baking paper, push your little lolly sticks in, then decorate away before the chocolate starts to harden!
How to enjoy them
Apart from giving these as cute little gifts that look just as good or better than ones you can buy, think outside the box…
- Keep them in a cool spot in your kitchen cupboard to give to your kids and grandkids as a treat.
- Delight your guests by serving them with coffee at your next dinner party. Why not?
- Make them for Halloween. Perfect for trick-or-treaters! You could even decorate with Halloween appropriate treats.
- Make for a baby shower (add pink or blue candies/sweets), bridal shower, wedding or any kind of party, really. Who wouldn’t be delighted to be offered one of these?
Variations
You can vary these to your heart’s content by adding different decorations. If you want to take things a step further, however, you can dye white chocolate different colours by adding a few drops of natural food colouring.
This idea might be great for things like baby showers! If you prefer you could use different coloured candy melts.
Making the lollipops for grown-ups? My favorite idea is to press in one of these candied orange slices!
More things to know (recipe FAQ)
I always melt chocolate in my microwave. It’s the easiest way. Just melt in a small bowl in 30-second bursts. I usually find 3 bursts of 30-seconds is about right, but it depends on your microwave. What I usually do is melt the chocolate so that it’s nearly but not quite melted. Then I stir it until it’s all melted. This is actually the easiest way of ‘tempering’ the chocolate so that it doesn’t develop a white powdery film on it when it sets again.
Of course, if you happen not to have a microwave you can melt the chocolate in a glass bowl over a saucepan of boiling water. Just make sure you don’t let the bowl touch the water.
Once wrapped, these should keep well in a cool, dry place until you’re ready to give them as a gift. Any kind of sealed, airtight cake tin or container works. It’s better if you don’t refridgerate them as this can lead to the sugar rising to the surface and discolouring the chocolate.
These should actually keep well for up to 6 months. Personally though I’d make them up to around 2 weeks in advance to be sure you’re giving them in perfect condition and with plenty of shelf life still in them!
Around 10 to 15 minutes. Which is why you have to decorate them quickly. Wait a while longer before packaging them until they are completely set. If it’s a warm day, you might want to pop them into the fridge or even the freezer for 5 to 10 minutes to help them along.
No, don’t freeze them. The chocolate may become discoloured. This is not necessary in any case. Just package them and keep them in a cool dry place (in an airtight container) until you’re ready to give them away.
More easy food gift ideas
- Gift someone a pan or box of freshly made baked goods or treats. Choose from addictive peanut butter cheerio bars , 1-hour cinnamon scrolls (my fave!), or Aussie hedgehog slice.
- You can’t get easier than these pretzels dipped in chocolate. Grab a bag of pretzels and your favourite chocolate and away you go.
- These dried orange slices are pretty on-trend, and they have SO many uses. They can be expensive though, but they’re so easy to make with just ONE ingredient – oranges!
- Chocolate food gifts are some of the easiest. Try ridiculously easy Christmas rocky road, chocolate bark or chocolate rocks.
- This list of 11 easy homemade chocolate ideas has some great ideas, too, especially for Christmas!
Or see all easy food gifts.
IF YOU MAKE THIS RECIPE, LET ME KNOW HOW YOU GET ON BY LEAVING A COMMENT AND RATING BELOW… AND DON’T FORGET TO SIGN UP TO RECEIVE ALL MY NEW RECIPES BY EMAIL!
FOLLOW ME ON FACEBOOK, INSTAGRAM, PINTEREST AND YOUTUBE.
Chocolate Lollipops (Homemade Food Gift With Video)
Ingredients
- 7 ounces chocolate, (I used milk, but use dark or white if you prefer)
- 1.75 ounces white chocolate, for decorating (optional)
- edible decorations, of your choice e.g. dried mango, other dried fruit, raw cashew nuts, pistachio nuts, chopped fudge, pecans, chopped candies / candy bars…
other things you need
- small lollipop sticks
- cellophane see-through gift bags
- odds and ends of fabric or paper gift ribbon
Instructions
- Line baking trays or wooden boards with baking / non-stick paper.
- Break the chocolate(s) into pieces in small glass / ceramic bowls and melt (in the microwave in 30-second bursts, or over a double boiler).
- Place tablespoons of melted chocolate on the baking / non-stick paper, then push a lollipop stick about a third of the way into the side of it, twisting as you do.
- Quickly decorate with your chosen treats, then leave to harden completely.
- Wrap each lollipop in a cellophane gift bag, and tie with a ribbon.


So festive and I’m sure delicious! Love them ! Thanks for sharing Helen!
Thanks Mira!
J’adore les cadeaux gourmands faits maison et tes sucettes sont extra!! Une super idée pour Noël!
Merci Eva!
I love homemade gifts, especially edible ones and are perfect to make in big batches. Lovely recipe.
Hi Janette. Thank you and hope you give these a go some time!
I’m a big fan of food gifts, and LOVE these!
Hi Chrissy! Thank you!
How adorable! A great gift for all of the nurses taking care of my mom! Pinned!
What a lovely idea, Bam! 🙂
What a fun, festive and easy! idea for an edible gift. I love these, Helen!
Thanks so much, Marissa!