Easy chicken katsu curry (with air fryer option)
on May 08, 2020, Updated Sep 13, 2020
This post may contain affiliate links. Please read my disclosure for more info.

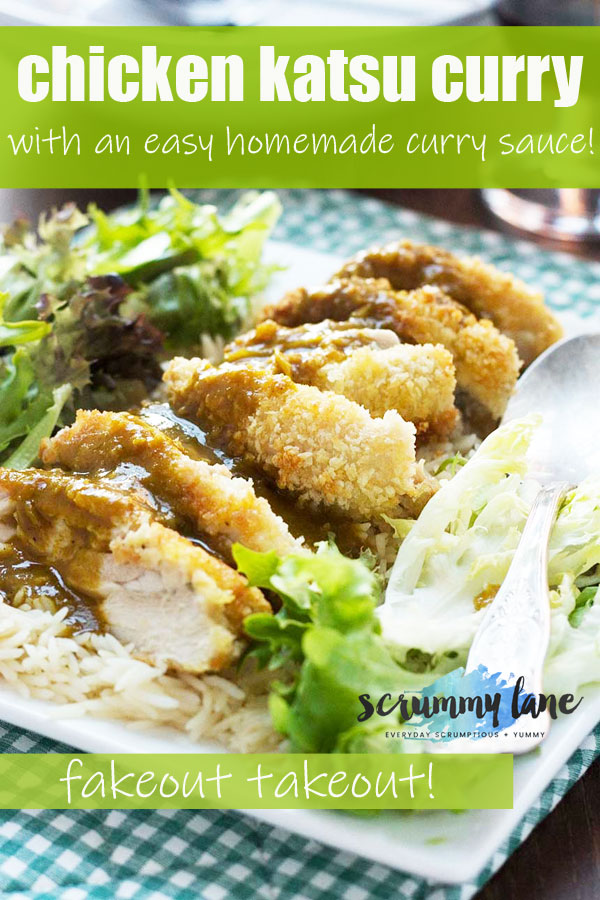
If you’re a sucker for crispy foods – like me and the rest of the world – then you’ll love this easy chicken katsu curry with a quick homemade katsu curry sauce. This is better-than-takeout comfort food at its best!
Better than a takeaway
I’ve always been impressed with the little Japanese lunch restaurants that you find all over Australia. They’re kind of ‘cheap and cheerful’ but the food feels nourishing, appetizing and really good value for money.
I’ve been known to pop in when I’m out and about around lunch time. Sometimes I order a simple chicken katsu (also very delicious), and other times something very similar to the katsu curry recipe in this post. AKA the ultimate Japanese comfort food.
For those times when you don’t want to eat out (or can’t), what do you know, this chicken katsu curry is much easier to make at home than you might think!
Why make a homemade Japanese curry sauce?
I’d heard a rumour that Japanese people usually buy pre-made curry sauce for a chicken katsu curry. But I wasn’t keen on the long list of ingredients I saw on the back of packets of katsu curry sauce at the supermarket.
I’m going to carry on making a homemade curry sauce for my chicken katsu. curry – and I hope you give it a try too!
What you need to make this
You’ve probably got most of the ingredients you need to make your chicken katsu curry already.
For the crispy chicken you need:
- chicken thighs
- flour, an egg and some panko breadcrumbs for coating the chicken
- a few tablespoons of oil for pan frying
For the fuss free katsu curry sauce you need:
- an onion and some garlic and ginger
- a spoonful of flour and curry powder
- good quality chicken stock
- a bit of soy sauce and honey to balance out the flavours
This recipe also works with chicken breasts and tenders. Find cooking instructions/times in the recipe notes below!
How to make a chicken katsu curry step-by-step
Don’t be put off by the fact you have to coat the chicken in breadcrumbs AND make a curry sauce. Both steps are quick and easy.
Here are the basic steps:
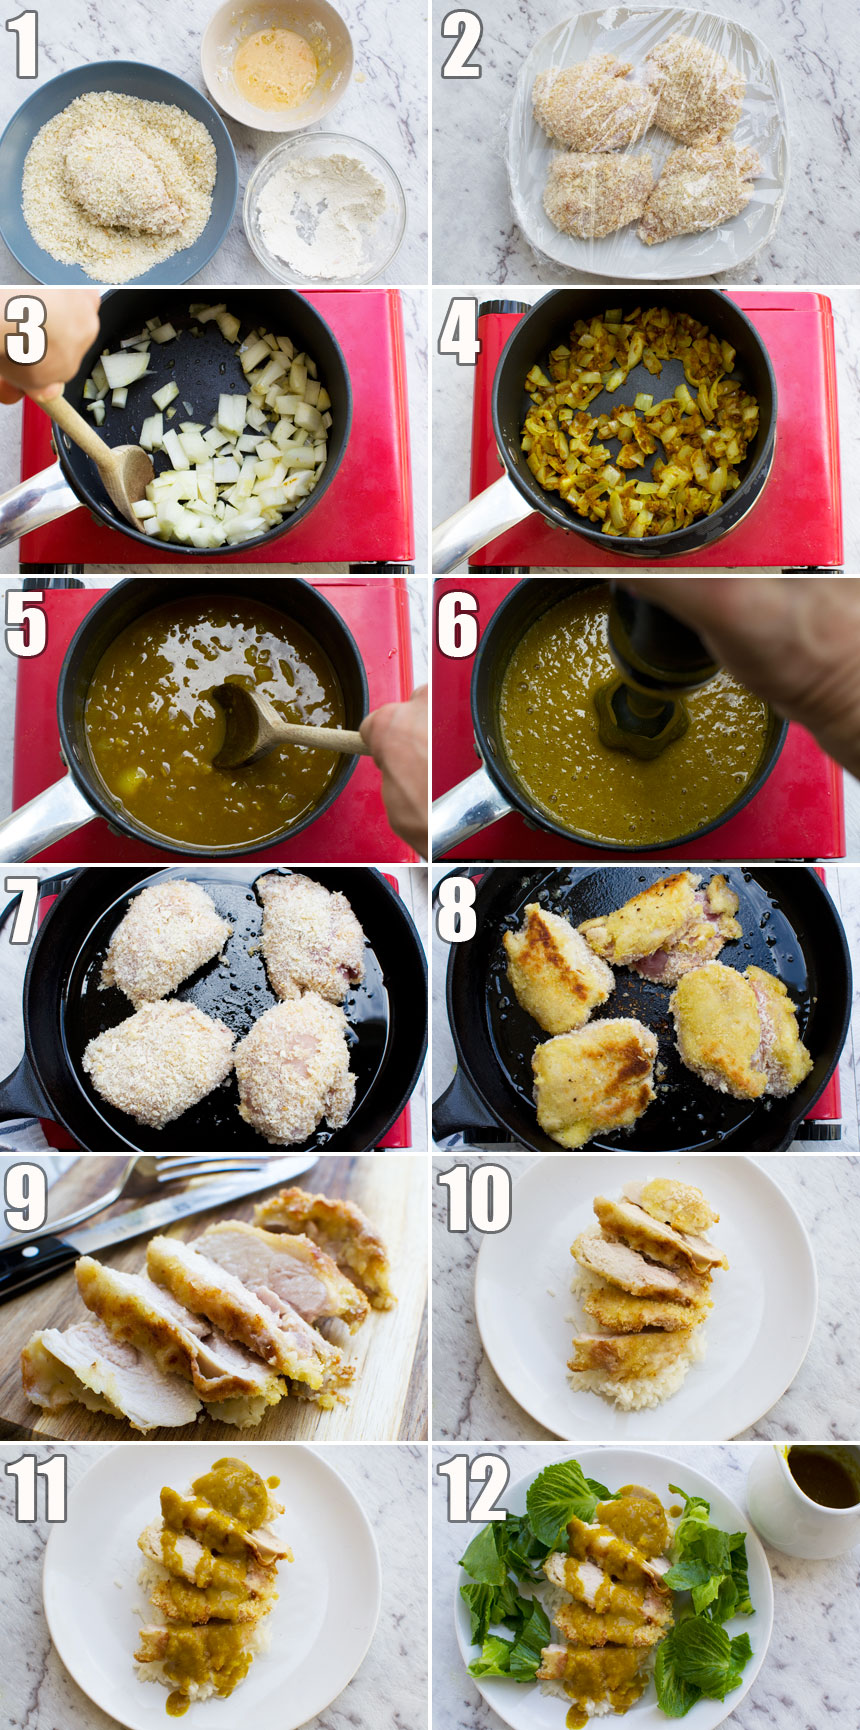
- Coat chicken thighs in breadcrumbs and pop into the fridge.
- Make the easy curry sauce on the stove top.
- While your sauce is simmering away, brown the crumbed chicken in a pan, then let it finish cooking in your pre-heated oven.
- If you prefer, skip number 3 and ‘fry’ in your air fryer (see below!).
To assemble your meal:
- Blend the sauce (a hand-held blender is great for this) and reheat in the pan.
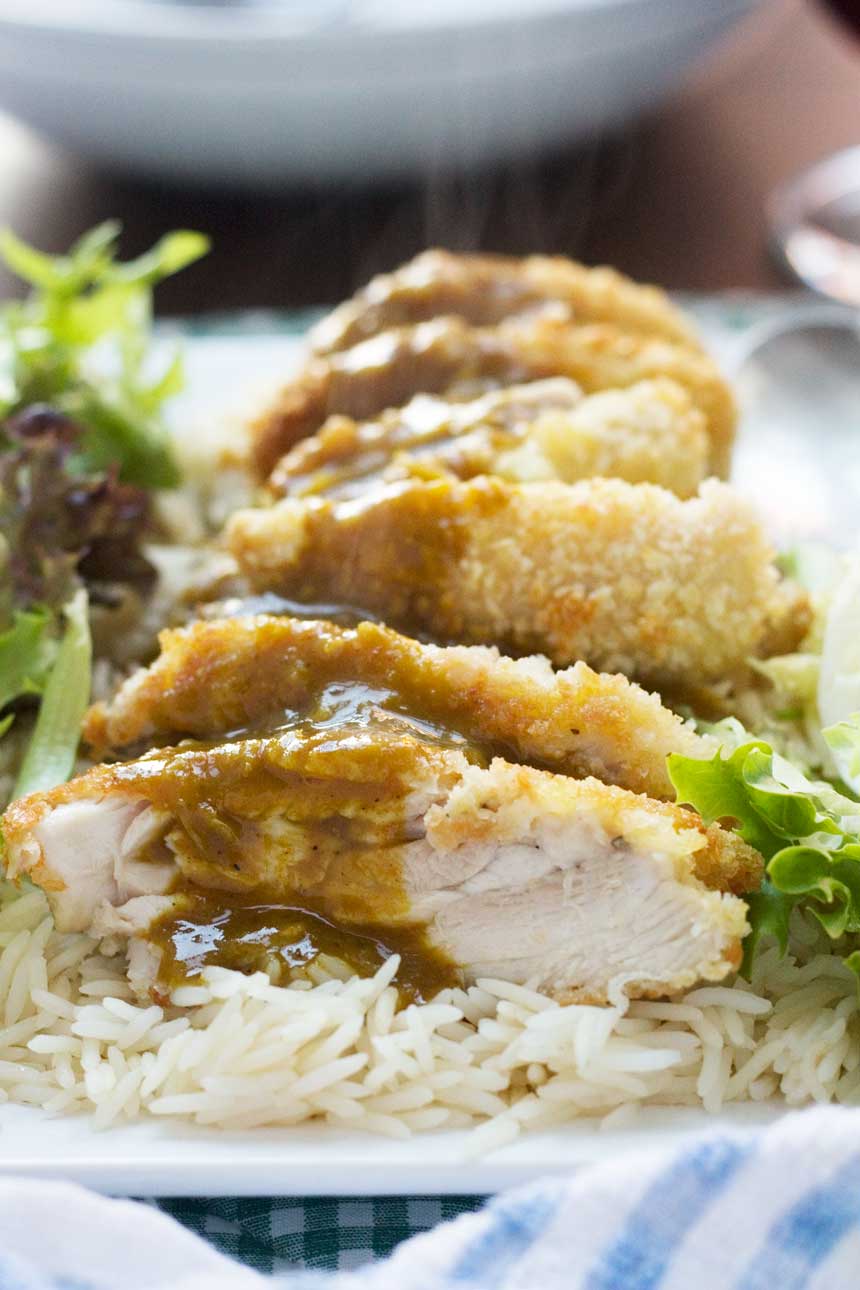
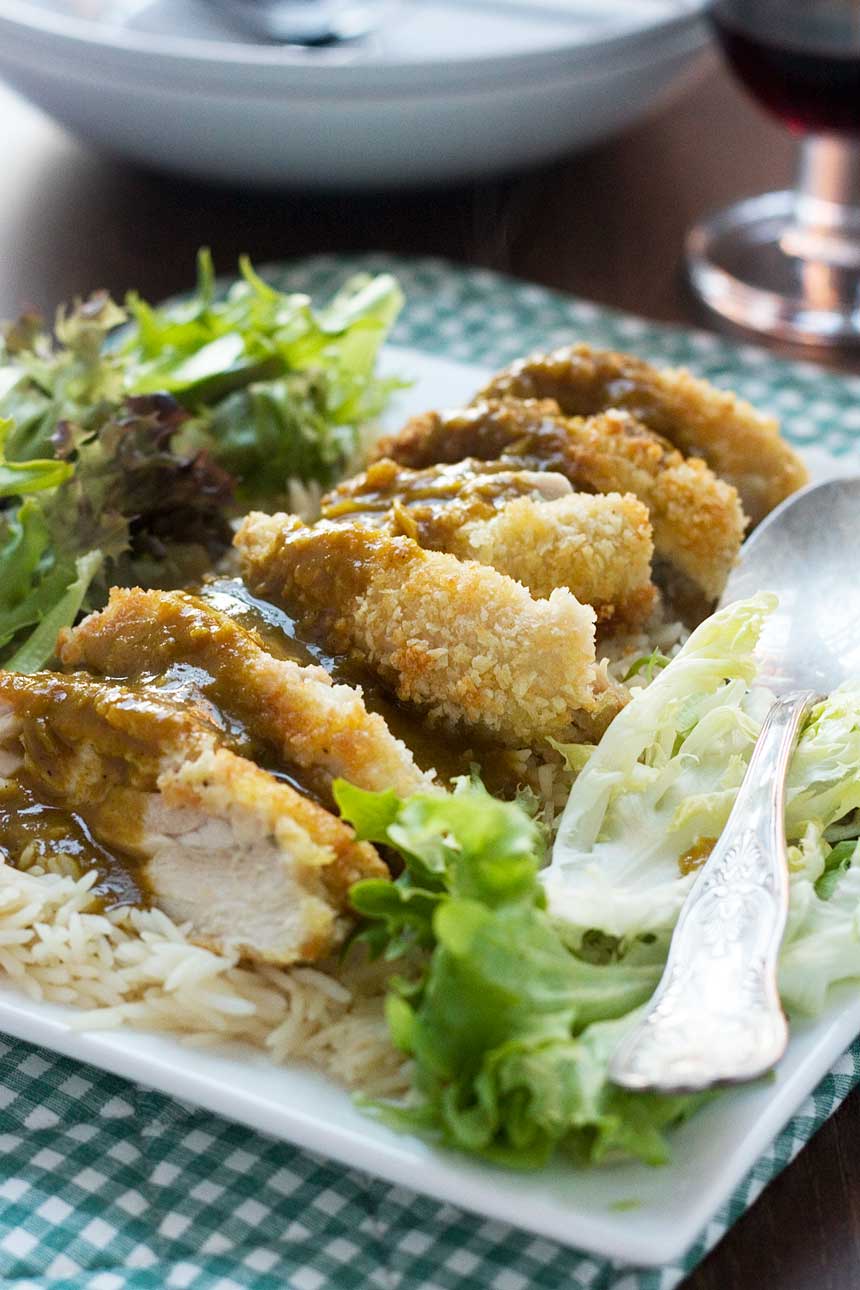
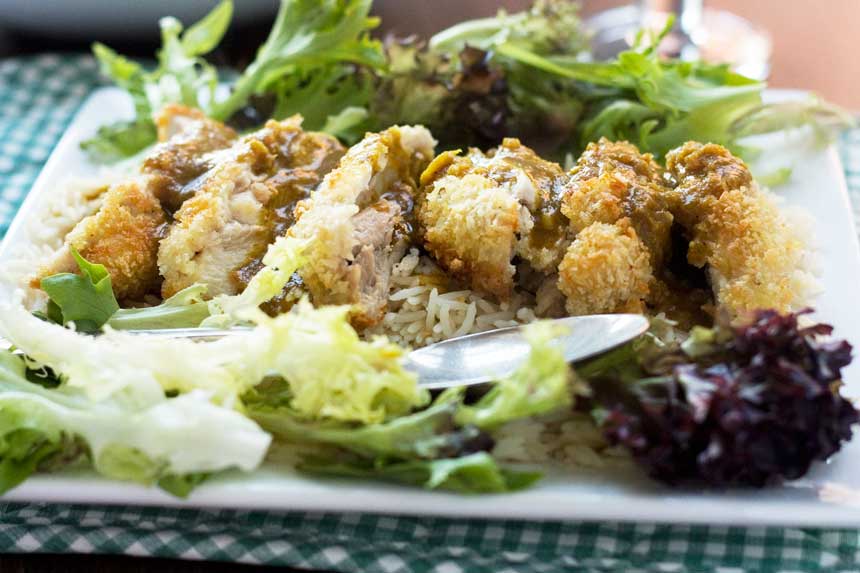
- Slice the crispy chicken into slices. Arrange over rice and pour over some sauce.
Got an air fryer?
If you’ve got an air fryer, you can ‘fry’ the chicken in it. In this case the air fryer isn’t really faster than the oven, but it means you don’t have to brown the chicken first in a pan.
Simply spray your breaded chicken all over lightly with oil, then air fry for 25 minutes at 200C/390F.
Personally I love air fryers because you don’t need to turn on your oven, and for many other yummy reasons such as air fryer banana bread, easy baked chicken thighs and Greek smashed potatoes!
There are many highly rated air fryers available of course, but we currently have a cheap Kmart air fryer, which works pretty well!
How to serve this
This is supposed to be a simple every day kind of meal, so I don’t complicate things.
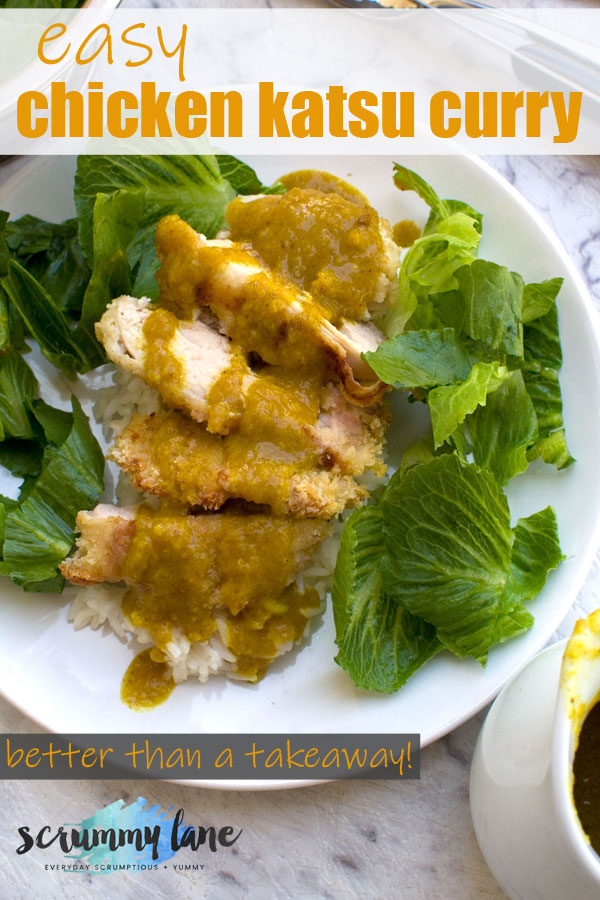
I simply arrange the sliced chicken on top of some rice and drizzle over some sauce.
I serve with fresh and crunchy lettuce leaves and extra sauce on the side. Perfect!
If you want a bit more vegetable action, feel free to serve some steamed broccoli or green beans on the side.
If you like this recipe, you may also like to try my simple chicken katsu recipe. It’s very similar but served with an even simpler sauce called a tonkatsu sauce (no cooking!).
More better-than-a-takeaway recipes
- 15 minute Thai basil pork stir fry (delicious!)
- Perfect Thai chicken and butternut squash curry that’s on the table in 40 minutes and makes a TON. We ALWAYS have some of this in our freezer!
- Sticky and delicious 15 minute Shanghai chicken
- Perfect Mee Goreng (spicy Indonesian noodles)
- Delicious but very simple chicken with peppers and cashew nuts
- Or take a look at all my Asian recipes!
IF YOU MAKE THIS RECIPE, LET ME KNOW HOW YOU GET ON BY LEAVING A COMMENT AND RATING BELOW… AND DON’T FORGET TO SIGN UP TO RECEIVE ALL MY NEW RECIPES BY EMAIL!
FOLLOW ME ON FACEBOOK, INSTAGRAM, PINTEREST AND YOUTUBE.

Easy chicken katsu curry (with air fryer version)
Equipment
Ingredients
For the chicken
- ¼ cup flour seasoned with plenty of salt & pepper
- 1 egg, beaten
- ¾ cup Japanese panko breadcrumbs, approximately
- 4 chicken thighs, (large skinless boneless)
- 3 tablespoons oil , approximately, for cooking
For the curry sauce
- 1 onion, chopped
- 2 garlic cloves, chopped finely or crushed
- 2 cm piece of ginger, peeled & chopped finely
- 1 tablespoon plain flour
- 1 tablespoon curry powder, mild or medium
- 1½ cups chicken stock
- ½ tablespoon soy sauce
- 1 teaspoon honey, or brown sugar if you don’t have honey
To serve
- 2 cups rice, (⅓ to ½ cup per person)
- 4 big handfuls crispy lettuce leaves
Instructions
- Put the flour, egg and breadcrumbs in three separate bowls. Roll each chicken thigh first in the flour, then in the egg and finally in the breadcrumbs.
- Place crumbed chicken on a plate, cover and refrigerate while you make the curry sauce.
- Add a splash of oil to a medium saucepan and cook the onion, garlic & ginger for a couple of minutes until softened.
- Add the flour and curry powder and cook for another minute while stirring continuously.
- Slowly add the chicken stock, then stir in the soy sauce and honey. Simmer for about 15 minutes or until the sauce has reduced and thickened a little.
- Meanwhile, preheat the oven to 180C/355F. Line a baking tray with baking paper and place a wire rack on the top if you have one.
- Heat up about 2 tablespoons oil in a frying pan, then fry the chicken for a few minutes on each side until golden. Place on the wire rack on the baking tray, then finish off cooking in the oven for 20 minutes. [If you prefer to cook your chicken in an air fryer, skip this step and refer to recipe notes for cooking instructions]
- Cook the rice according to packet instructions while chicken is baking. When the sauce is ready, blend it with a handheld blender or in a food processor until smooth. Then pour back into the pan and re-heat ready to serve.
- Slice each crispy chicken thigh into about 4 thick slices length-wise, then serve over rice. Drizzle a little sauce over each dish. Serve with the crispy lettuce leaves and extra sauce on the side.


I made this last night for my family, it was a hit! The kids adored it. Thank you! I am going to try so many more of your scrummy recipes x
Hello Jennifer! Thank you so much for trying the recipe. Aww I’m so pleased you all enjoyed it so much! I guess it is quite kid friendly as it’s a pretty mild curry. They also might like the crispy chicken burgers, and one of my all-time favourite recipes is this chicken butternut squash satay curry. You’d have to tone down the spice for the children, but I think that might be something you could all enjoy too 🙂
I always find myself stumbling across your recipes and thought it was about time I expressed my appreciation! Your katsu curry is a staple in my home. I’ve been making it for the past 2+ years, usually once a fortnight. I just love it!! Easily one of my favourite dinners. The sauce is delicious and so easy to make. No hard to find or expensive ingredients. Perfect 🙂
Hello Sophie! Thank you SO much for popping by! You’ve made my day, actually! This is one of my oldest recipes but I’m so glad to hear that you’re still enjoying it. Maybe it’s time to revamp the post with some better photos and less waffle!
You’ve made me want to make this again, now…
Merry Christmas!
Hi Helen – can you use chicken breast instead of thighs please?
I always struggle to find good quality thighs!
Thank you x
Hi Mal! Yes, absolutely! No problem at all. I hope you enjoy it!
That chicken looks so perfect juicy and crispy all at the same time. You’ve made me hungry!
Happy to have made you hungry, Kristen! 🙂
Ooh Helen! This type of curry is new to me, but it looks unbelievable. I’ve been relying so heavily on quick meals lately so this is right up my alley. Plus that crispy chicken? Mmmmm. 🙂
Helen what a stellar looking chicken katsu curry! I loved this when I used to live in Japan. Yours doesn’t look simple from how it looks as it looks delicious but it is so easy-love it! 😀
Helen…I think great food never has to be fancy it has to be good…and this SOOOO is!!! Love this! And I know it’s random…but I love how the rice looks in the photos…it looks like it’s sooo full and fluffy and ready to be gobbled up!
Une des choses que j’aime dans ton blog, c’est que tu me fait découvrir des recettes nouvelles. Comme cet succulent poulet Katsu! Une très bon recette, il a l’air tellement appétissant !
Merci, Eva! Je suis tres contente que je te fais decouvrir des recettes nouvelles! 🙂
Brown curry is one of the few curries I’ll eat, and I LOVE it so much. I never really considered making it from scratch before, so I really love this idea and inspiration! Thanks for sharing it, I’m going to make curry next week 🙂
Hello Ala! I’ve never heard this called brown curry before, but it’s a perfect description! I really hope you give this a go some time – don’t worry, it’s so easy!
I absolutely LOVE Katsu curry!! Only made it once and it didn’t look half as good as this! 😛 x
Thank you, Nadia! I must admit I was quite pleased with these pictures. It’s a bit tricky to make brown food look appetizing sometimes!
This looks absolutely fab as always Helen and easy. It doesn’t look easy in the picture and honestly, if i make this for guests I’m gonna imply that it was hard! Is that bad? I just want people to think I went through a lot of effort for them. I love the crispy coating and how you used thighs. I am finally over my I-won’t-cook-with-thighs issue, and they seem to be more moist than breast meat. I feel as weird talking about thighs and breasts on your blog so I’m gonna take a break and unload the dishwasher and clean the kitchen!
Hahaha … sorry to have driven you to kitchen duties, Laura! I’m really happy you like this enough to consider making it though, and no I don’t think it’s bad at all to make people think you went to a lot of trouble. You can just ‘forget’ to mention that it was easy! It really is, though, so good luck! And congrats on getting used to using thighs!
This looks SO good, Helen, I can see why it was your choice at the food show! I love anything and everything curry, so this will have to happen at our house some time soon!
Hi, Denise! Really happy that you like this. I just love the combination of crispiness and a simple, mild curry. Hope you do get around to giving it a go – if you do, pop back and let me know how you got on!
I remember the magical faraway tree! I remember my Daddums reading it to me as a little girl. Hungry Hubby loves Katsu and gets it frequently when we go to Wagamamas but I’ve struggled big time in replicating the flavour at home. Well, it always comes out a bit watered down for me no matter which curry powder I use. I’ll have your recipe a go but I suspect I’ll double up the curry powder. Will report back!
Hello Jo! Thanks so much for popping by and commenting! I’m not a katsu connoisseur so this was definitely good enough for me, but I’m not sure mine can compete with Wagamama’s version! I know some versions I looked at added carrots into the mix too which could give some extra depth, but I wanted to keep things simple. I used a medium curry paste too which was spicy enough for me but the hubs said he could have enjoyed it better a bit hotter. Anyway, do let me know if you give it a go!
I love katsu curry and the chicken version sounds even better! Like the way you make the curry, it looks so rich and simply. I might add a bit shredded cheese on top, YUM!
Hi, Maggie! Really, you would add cheese on the top of a curry? Well, why not???!!! 🙂
Love it! Wish I had it for dinner with lots of sauce of course! Pinned!
Thank you so much, Mira! I poured much more sauce over my portion than what you can see in my photos, of course!
I love chicken katsu and I love a good Japanese curry. This is my idea of comfort food heaven.
Hello, Sara! Really happy you’re a fan of this, too! 😉
I have never made Katsu Curry but it sounds exactly like a dish that would be perfect for my house..Thank you!
You’re welcome, Tania! It’s sooo easy and I really hope you give it a go. Let me know if you do!