Easy Basque Cheesecake (With Greek Yogurt)
on Feb 12, 2022, Updated Apr 25, 2022
This post may contain affiliate links. Please read my disclosure for more info.

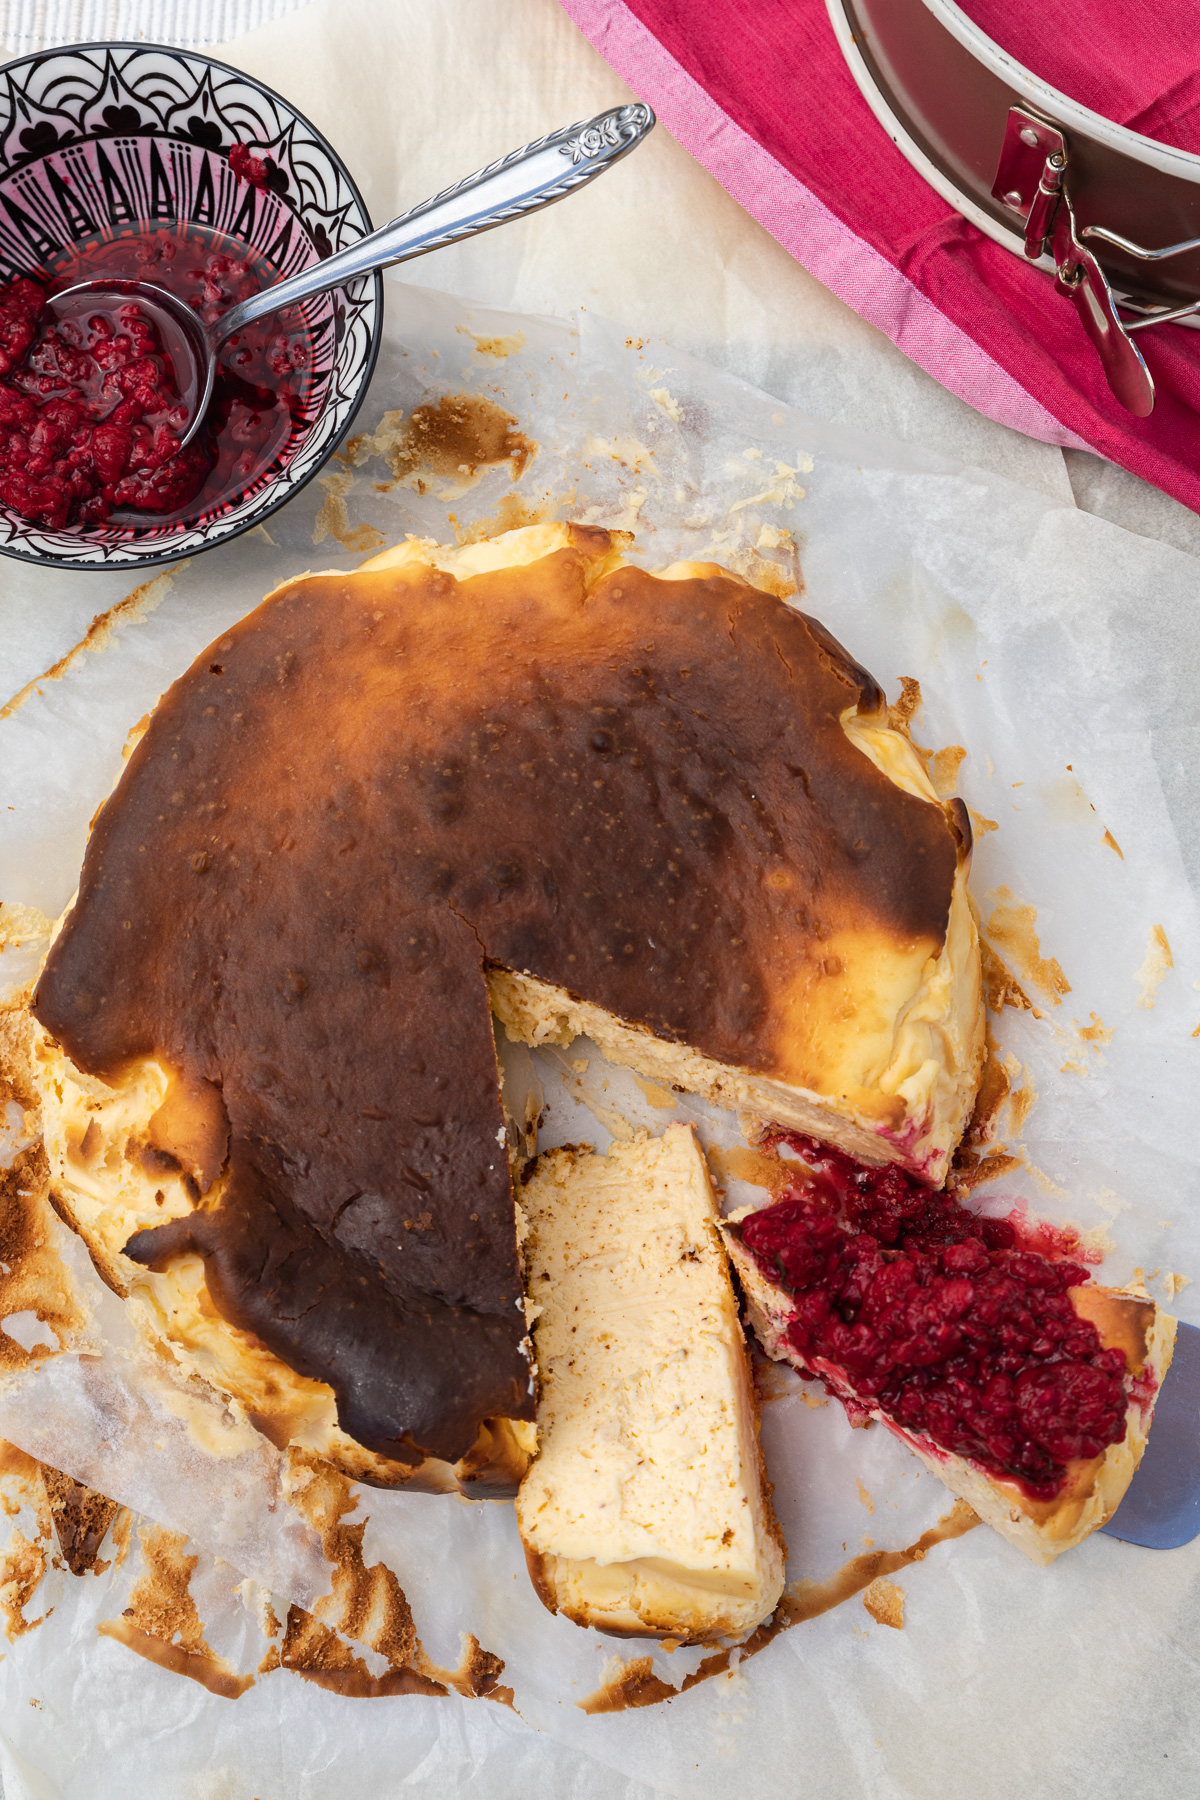
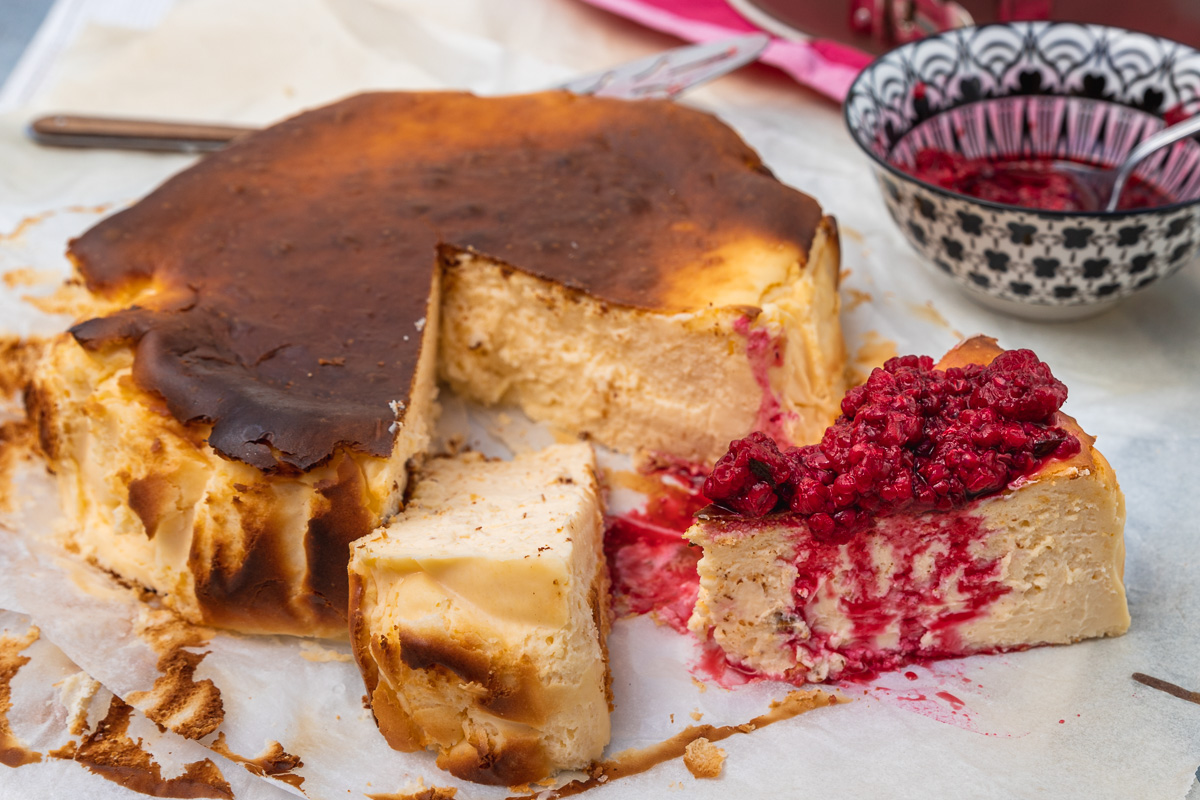
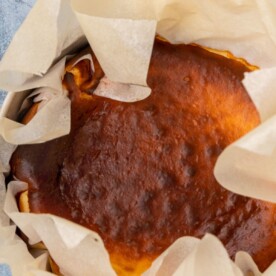
If there’s one rule in baking, it’s ‘don’t burn’, right? But with this amazing Basque cheesecake (with Greek yogurt for extra tang), this rule is turned on its head. This easy version is like a quick baked crustless version of a New York cheesecake. With its dark golden and caramelized top, this cheesecake is so easy, but sure to impress!
What’s a Basque cheesecake?
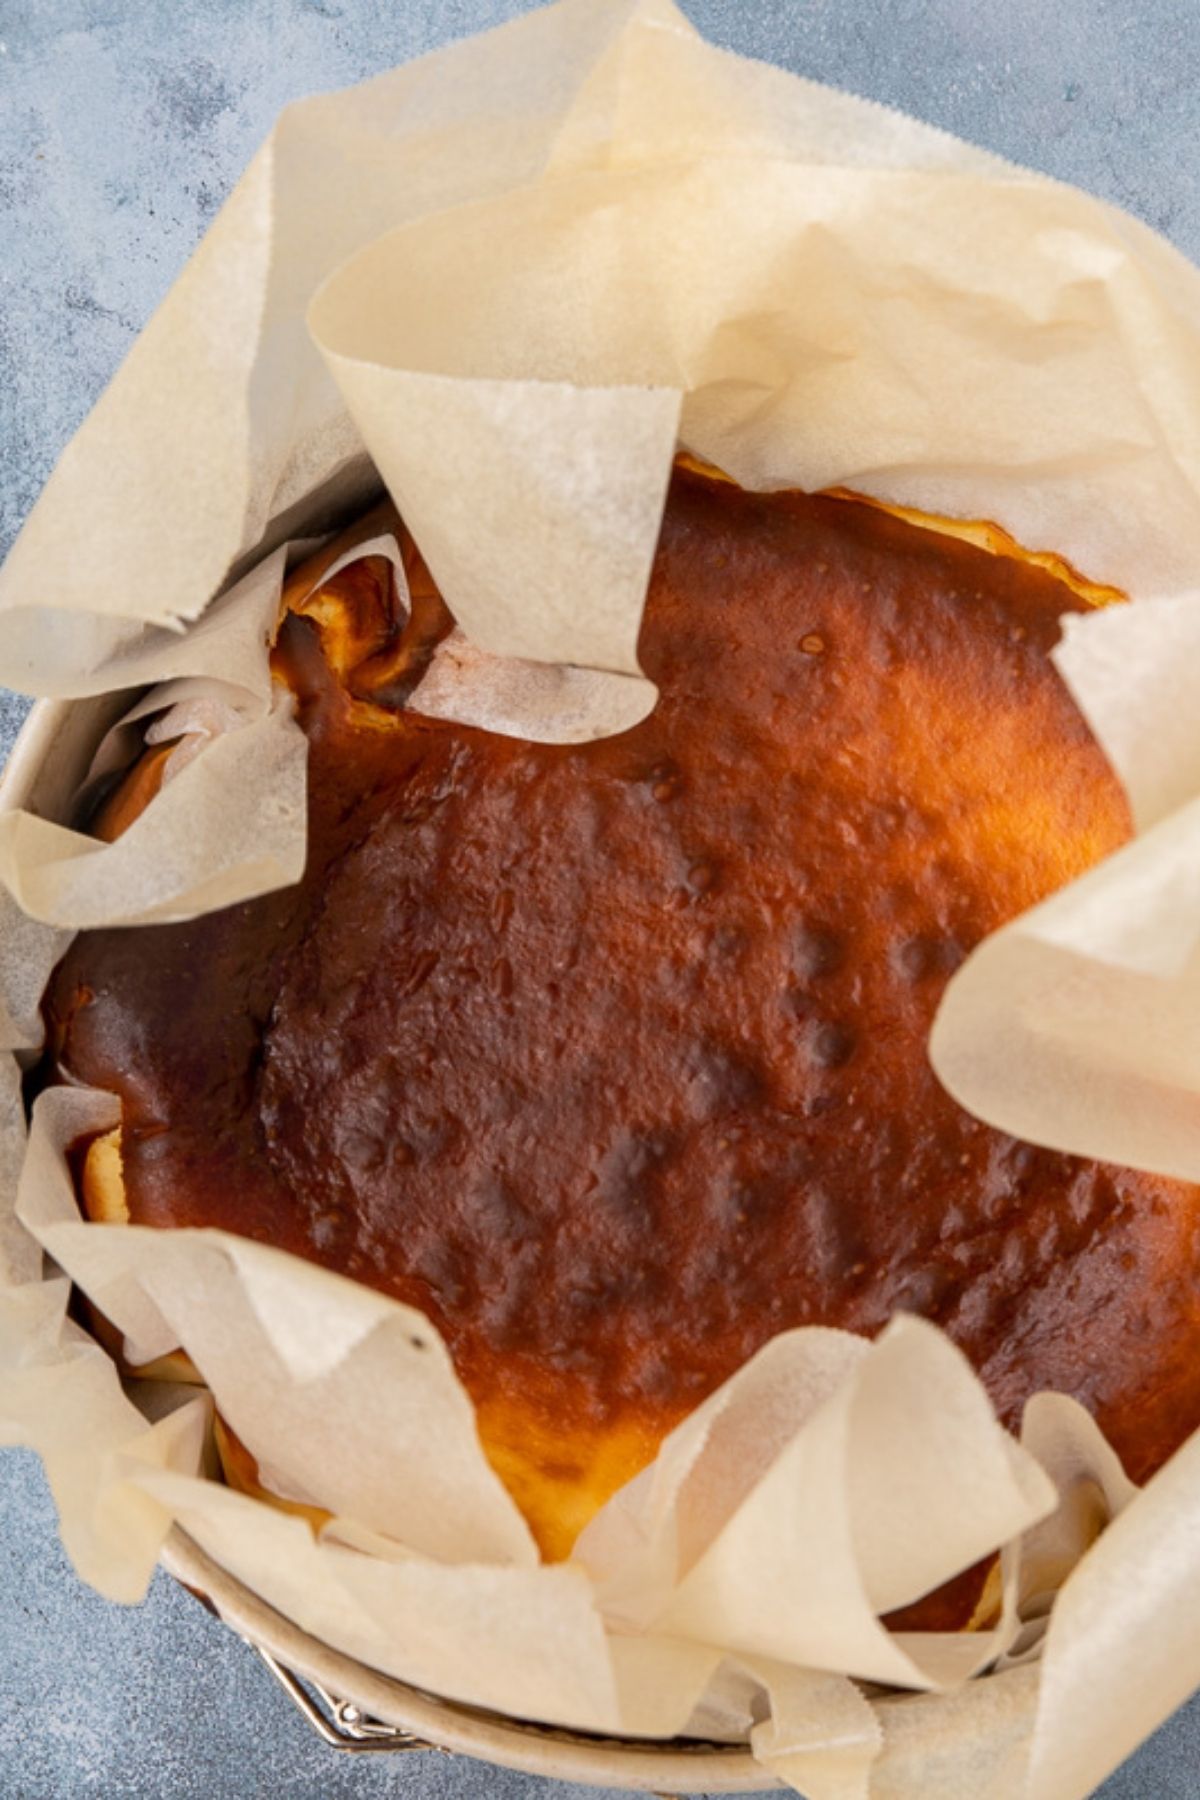
Otherwise known as a Basque burnt cheesecake, you might be wondering why this is what it’s called. Well, the outside of the cheesecake looks… burnt! It’s cooked at a high temperature for a (relatively) short time. This gives it its impressive (ugly duckling?) golden brown top.
Another name for this cheesecake is a San Sebastian cheesecake. This modern Spanish dessert originates from Spanish restaurant La Viña in San Sebastian in northern Spain. Chef Santiago Rivera developed the original recipe a few decades ago, and now it seems everyone wants a slice!
Very easy: check. Impressive: check. It’s a perfect choice for a simple dinner party, a Valentine’s day dessert or any special occasion.
Cheesecake lover in general? You might also like to check out my other quick and easy cheesecake recipes such as this easy ginger and white chocolate cheesecake (Wagamama copycat), this delicious baked white chocolate cheesecake with raspberry puree, and these chocolate malt cheesecakes in a glass.
Why you’ll love it
Here are more reasons why this easy and slightly lighter take on this modern Spanish dessert is so special:
- The inside is surprisingly light and smooth. I include Greek yogurt in my recipe for extra tang and lightness. Cook it for a shorter time for a soft and silky, almost custardy interior. Serve it while still slightly warm if you like. Cook a little longer and serve chilled for a denser result that’s more like a New York cheesecake without a crust.
- There’s no crust, which is what makes a burnt Basque cheesecake so easy to make. Just mix everything together, pour into a spring-form pan, and bake. No water bath necessary!
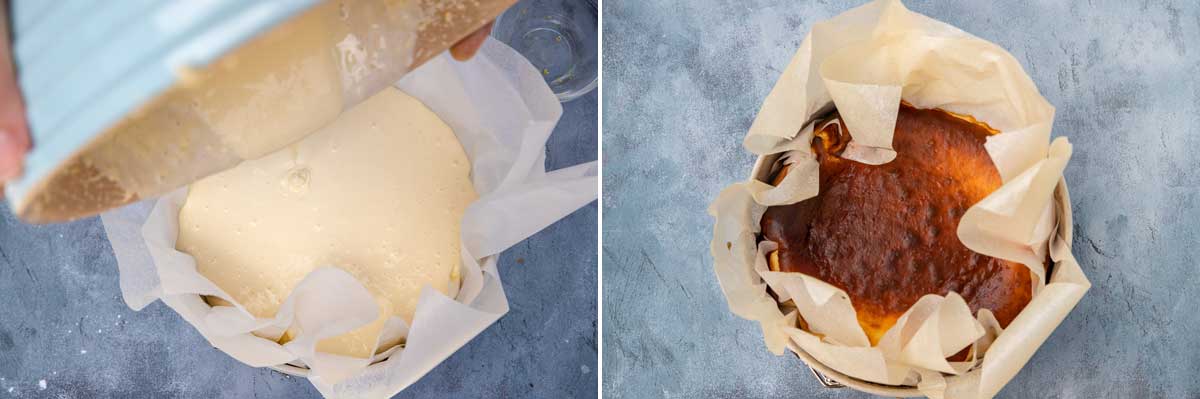
- Watch it rise up like a soufflé as it cooks! Pour the batter into a high-sided spring form pan lined with a triple layer of baking paper pointing straight up. The cheesecake will sink as it cools. The paper is part of the impressive presentation so only remove it as you serve the dessert.
- Tweak the ingredients to match your taste. Add salt, vanilla, lemon zest, all three of these or none.
About the ingredients
You only need 5 main ingredients (plus a few optional ones) to make this – the easiest baked cheesecake recipe ever!
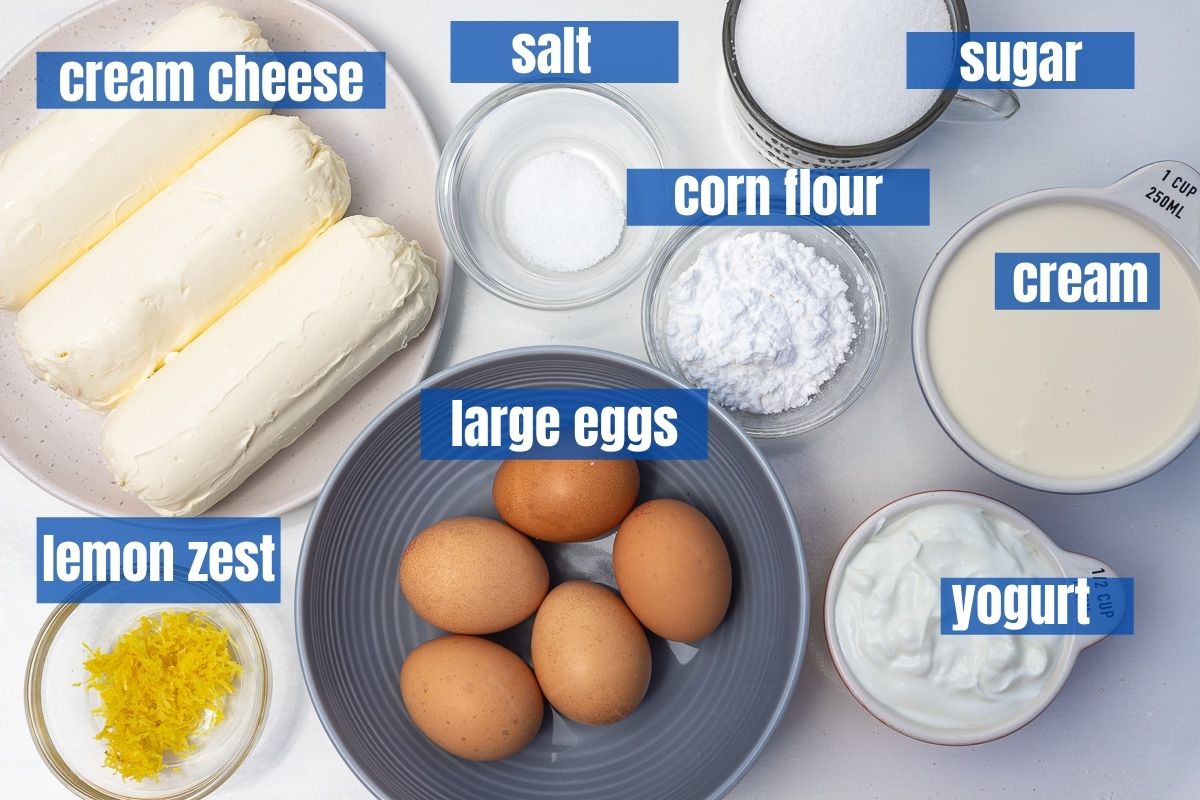
Cream cheese: Philadelphia is great, as are supermarket brands of plain cream cheese. Make sure you use full fat – this cheesecake is supposed to be ultra creamy! Other creamy cheeses can work, too. Try replacing a third of the cream cheese with mascarpone, for instance.
Sugar: Use ordinary white sugar. Different Basque cheesecake recipes call for very different amounts. I’ve kept it to a modest amount in my recipe – just 1 cup. Don’t be afraid to increase or decrease the amount if you have a sweeter (or less sweet) tooth!
Eggs: 5 large.
Heavy cream: Sometimes called double cream (UK), thick cream or thickened cream (Australia). This is not the time to go low fat!
Greek yogurt: How do you make (arguably) the best cheesecake in the world even better? 😉 By adding half a cup of Greek yogurt for a tiny bit of tang! Use sour cream or crème fraiche instead if you like.
Salt: Just a teaspoon to complement the caramelized crust.
Cornflour: Different burnt cheesecake recipes contain different amounts of flour. I’ve gone for 3 tablespoons. It’s not much but it helps the cheesecake to ‘set’ so it’s easy to slice. Cornflour makes this a gluten free cheesecake, of course, but feel free to substitute with ordinary plain flour if you wish.
Lemon zest: This is another optional ingredient. If you don’t have a lemon, no worries. Replace with lemon or lime zest, or just skip the zest.
How to make it
A no crust cheesecake is bound to be easy to make, right? Here’s just HOW easy:
Step 1: Prepare the pan. Spray lightly with oil first to help the baking paper stick. Then line with 3 layers of baking paper at different angles. Don’t fold it down at the top – keep it pointing straight up so the cheesecake doesn’t overflow as it cooks! (Watch the how-to video to see what I mean!
Also preheat the oven to 210C/410F.
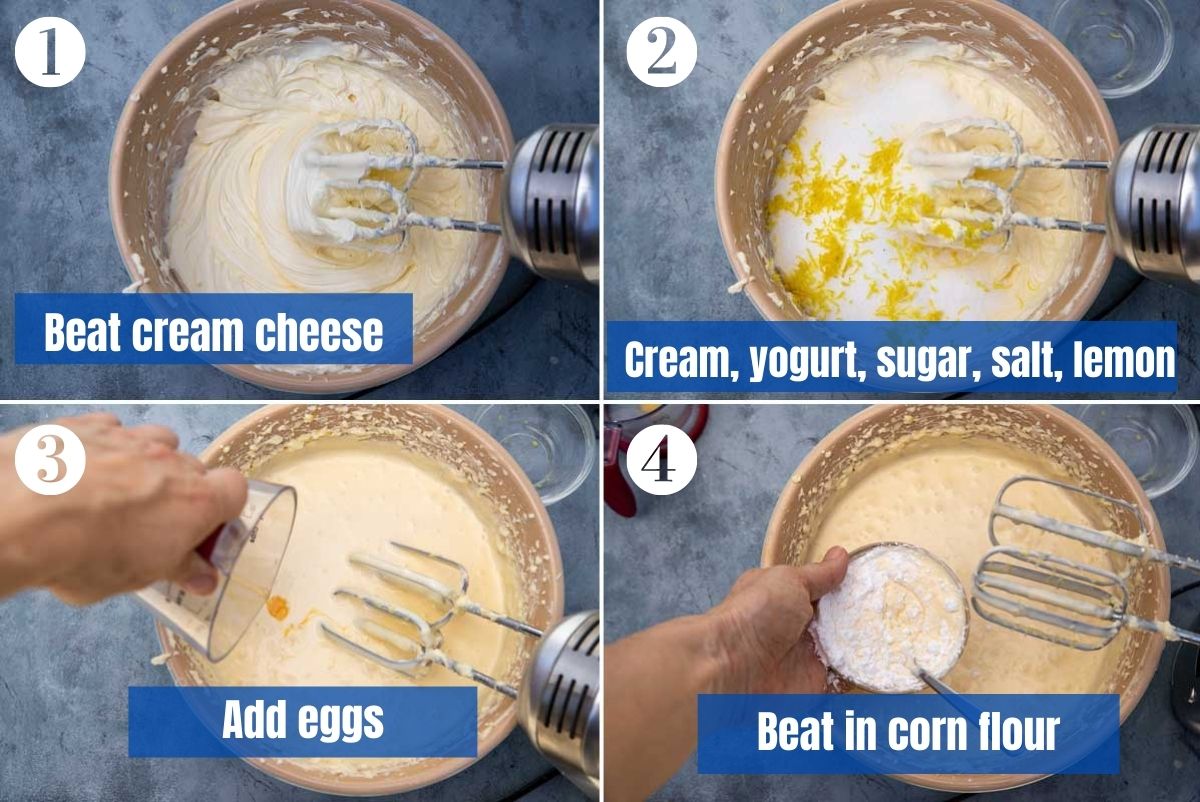
Step 2: Grab a big mixing bowl. Beat the cream cheese on a low speed. Beat in the cream and yogurt, then the sugar, salt and lemon zest.
Step 3: Add the whisked eggs a little at a time, just until mixed in thoroughly.
Step 4: Mix some batter into the cornflour. Then whisk this into the mixture too.
Step 5: Pour the cheesecake batter into the prepared tin/pan. Bake at a high temperature for around 40 minutes or until the top is dark golden, the edges are set and the middle is still wobbly.
Helen’s Top Tips
- Let the cold ingredients come to room temperature before making the recipe. They’ll combine easily this way (hopefully) without splatting all over your kitchen!
- The key to a perfectly smooth, creamy and not-too-eggy cheesecake is to combine the ingredients gradually and at a low speed. Stop as soon as everything is properly combined.
- Try using a food processor for zero kitchen splattering!
- Leave the baking/parchment paper on until serving. It’s part of the impressive presentation!
How to serve and variations
Another great thing about this Greek yogurt burnt cheesecake is that it tastes good enough and looks fabulous enough to serve on its own. No fussy toppings necessary!
You can actually serve it slightly warm, at room temperature or chilled from the fridge. I really like it chilled, but see what you prefer.
In Spain, this cheesecake is often served with a sneaky glass of sherry (sweet Spanish wine) on the side! If you’d like to give this a try but can’t easily find sherry, just serve with any sweet red or white wine. This would be an especially nice touch at a dinner party, don’t you think?
What I usually do is serve my cheesecake with a bowl of red berries on the side. Fresh is great, but frozen work really well too as they look more like a simple topping as they defrost.
Feeling adventurous? Another thing you can do is add a flavour to make it a bit different. Vanilla is the obvious choice – just whisk 1.5 teaspoons into the batter.
- For a chocolate Basque cheesecake, warm the cream in the microwave, before pouring it over 200 grams/7 ounces dark chocolate (70% cocoa). Stir well, then let it cool before making the recipe as described below, but using your ‘chocolate cream’ instead of ordinary.
- For coffee flavoured, again warm the cream, then dissolve 2 tablespoons of instant coffee into it. Let it cool, then proceed with the recipe, using coffee flavoured cream instead of regular!
- For a dramatic looking green matcha Basque burnt cheesecake, sift 2 tablespoons of matcha powder into the mixture.
- Finally, why not try stirring some crushed Oreos into the batter before pouring it into the pan for a super decadent Oreo San Sebastian cheesecake?
Top tip: Make this 5-minute raspberry puree to pour over the top of this cheesecake. It’ll elevate it to the next level, and you won’t believe how easy it is!
More things to know (recipe FAQ)
Well, obviously the burnt cheesecake doesn’t have a crust on the bottom. Instead, you could say it’s self-crusting with the dense, golden baked exterior. As for the taste, I think that both are very similar. Some Basque cheesecakes are creamier and lighter. But that depends on the exact recipe and whether the cheesecake is served chilled or not.
Just as a side note, a Japanese cheesecake is a similar type of baked crustless cheesecake. It’s also very popular but generally lighter and airier than its Spanish counterpart! Try Just One Cookbook’s Japanese cheesecake recipe if you’re interested in trying it!
As I general rule, I let it bake for around 30 minutes, then I check it. Then I bake for another 5 to 20 minutes, or until it’s bronzed and set on the top and around the sides but still very jiggly in the middle. It will firm up as it cools!
In my oven, my cheesecake is usually ready in around 40 minutes. I like it to be firm around the edges and light and soft in the middle. If you prefer yours slightly runnier, go ahead and underbake it a little.
If you check your cheesecake after, say, 40 minutes and the sides are set and the centre is jiggly, you’d be right in thinking that it’s done. BUT, what if the top still doesn’t look… well… dramatically browned enough?
In this (rare) case, just turn on the broiler/grill for a minute or two. Keep a VERY close eye on the cheesecake, though. The difference between nicely browned and truly burnt (which doesn’t taste good!) could be just a few seconds.
Yes, you can! Most cheesecakes freeze well, and this one is no exception. Just make sure you wait until it’s completely cool. I’d keep it in the pan and wrap really well before freezing. Alternatively, if you don’t want your pan to be in the freezer for weeks on end, carefully take the cheesecake out of the pan but keep it in the baking paper. Wrap with several more layers of cling wrap/aluminium foil and freeze for up to 1 month.
You can freeze it for longer than a month if you like, but I think cheesecakes begin to deteriorate in taste and texture after this.
While this cheesecake is low-carb as it doesn’t have a crust and has very little flour in it, corn flour is not strictly speaking ‘keto’. If you like you can reduce the amount of flour or skip it altogether and this cheesecake recipe will still work.
The cheesecake is, however, gluten free! You can also make it with ordinary gluten free flour if you don’t have any corn flour.
Take a virtual trip to Spain
Having a dinner party? How about serving a Spanish style main course, too? This one pan chicken with chorizo and cherry tomatoes is a crowd pleaser, and it’s so quick and easy to make.
More easy impressive desserts
I think this easy burnt Basque cheesecake recipe is absolutely perfect for impressing at a dinner party. Here are a few similar easy, make ahead desserts:
- This 6-ingredient gooey Swedish chocolate cake is ridiculously easy to make, and never fails to impress. Alternatively, try this similar-but-different (arguably slightly classier) Italian chocolate cake.
- Transport your guests to Italy with this super easy apple cake (torta di mele).
- This ginger and white chocolate cheesecake is a pretty good copy of Wagamama’s! Cookie butter lovers will also love this easy baked Biscoff cheesecake.
- I call this blueberry clafoutis ‘impossibly easy’. You just have to try this delicious creamy and custardy dessert!
Or see all my quick and easy desserts.
Easy Basque Cheesecake (With Greek Yogurt)
Equipment
- Cuisinart Gold 9 inch springform pan (8 to 10 inches fine)
Ingredients
- 1¾ pounds cream cheese, (3⅓ cups, 26.5 ounces or 750 grams) room temperature if possible
- 1 cup heavy cream, (250ml) double/thickened cream, not single or light cream
- ½ cup Greek yogurt, (9 ounces or 250 grams) regular plain yogurt, sour cream, crème fraiche work too
- 1 cup sugar, (7¾ ounces or 220 grams)
- 1 teaspoon salt
- 1 lemon, (zest only) optional
- 5 large eggs, lightly whisked, room temperature if possible
- 3 tablespoons corn flour, (corn starch) ordinary or gluten free flours work too
Instructions
- Prepare an 8-9 inch spring-form pan/loose-bottomed pan by lining it with 3 layers of baking paper at different angles. Don't trim or turn down the paper at the top – keep it pointing straight up.
- Preheat the oven to 410F/210C.
- In a large mixing bowl, use a hand-held whisk to beat the cream cheese just until smooth. Alternatively, use a food processor.1¾ pounds cream cheese
- Beat in the cream and yogurt, followed by the sugar, salt and lemon zest, if using.1 cup heavy cream, ½ cup Greek yogurt, 1 cup sugar, 1 teaspoon salt, 1 lemon
- Now beat in the whisked eggs, little by little, until well combined. Don't overmix.5 large eggs
- Add a little of the cheesecake mixture to the corn flour/corn starch and mix well. Then beat this mixture into the cheesecake, again just until well combined. Alternatively, just sprinkle the corn flour evenly over the cheesecake mixture and beat in.3 tablespoons corn flour
- Pour the mixture into the prepared pan. Tap the pan on the benchtop to even out and get rid of any large air bubbles.
- Bake for roughly 40 minutes, or until the sides of the cheesecake are set and the centre is still quite wobbly and the top of the cheesecake is a fairly dark golden brown.
- Let cool in the pan. Then either chill for at least a few hours or overnight or serve while still slightly warm or at room temperature (it's up to you).


Wow, can’t wait to try it. Maybe with your inspiration of macerated berries. Yum! Thank you! ( ps Do not know why I’m looking at recipes while I’m fasting before surgery lol !!)
Hi Ania! Haha isn’t that just always the way! Something to try after the surgery 😉 So glad you like the idea of this, and yes it’s absolutely delicious with berries 🙂