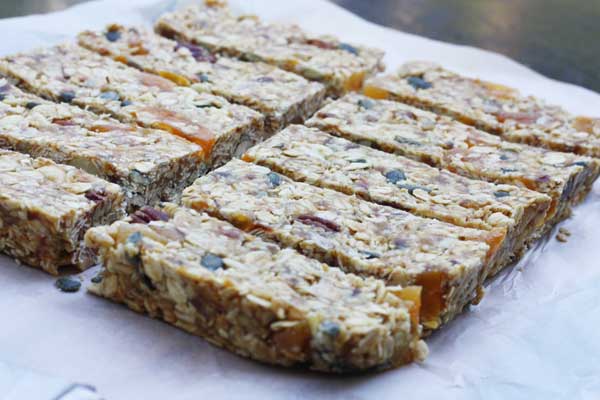
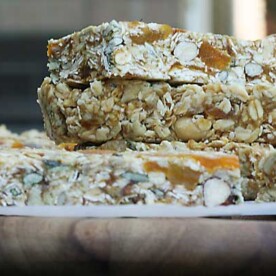
Healthy Homemade Granola Bars With White Chocolate And Pecans
on Feb 08, 2021, Updated Mar 11, 2022
This post may contain affiliate links. Please read my disclosure for more info.
When it comes to healthy snacking, you can’t go wrong with a no bake homemade healthy granola bar! Stuff it with some sneaky white chocolate and pecans and it’ll taste like a delicious treat. Make them in just 15 minutes with as few as 6 wholesome ingredients and you’ll have healthy sweet snacks all week.
Why you’ll love them
- Perfect for life on the go! Healthy enough to pass for breakfast. But just as good as an afternoon or night time snack, or for a pick-me-up after the gym.
- No-bake and super easy to make in under 15 minutes for snacks all week. Made with just a few simple and healthy ingredients.
- Very easy to customize according to what you have in the pantry. And what you love! Change up to your heart’s desire!
- Super healthy, but also taste like a delicious chewy treat!
- Great snacks ‘to go’, and delicious straight from the freezer.
- Great for special diets as they’re gluten free, vegan, and dairy free if you skip the chocolate or replace with 70% cocoa dark chocolate.
About the ingredients
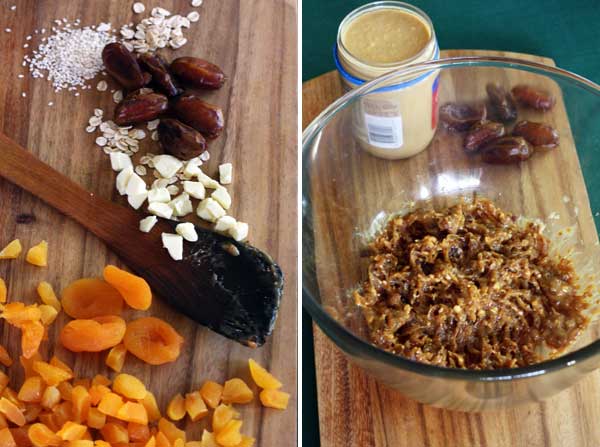
Pitted dates: Medjool dates are big and taste like caramel. Mmm. But any pitted dates work.
Rolled oats: Don’t use quick oats. Old fashioned are OK!
Pecan nuts: Chopped. Replace with a different nut or skip the nuts altogether if you prefer.
Honey or maple syrup: Or a mixture of both. Both work. You just need something to help stick the granola bars together (along with the nut butter!).
Peanut or almond butter: I prefer natural nut butter. Any kind of nut butter works.
White chocolate chips or chunks: Add dried fruit (I like apricots), raw cacao powder (or cocoa), or seeds too if you like.
A bulk buy store (with scoops and bins) is great for sourcing high quality ingredients for extra tasty no bake granola bars!
How to make them
With just 6 main ingredients, these are the easiest homemade healthy granola bars you can imagine.
Here’s how you make them in just a few very easy steps (ready in under 15 minutes!):
Step 1: Make a paste out of the dates in a powerful food processor like this Breville Sous Chef Peel And Dice.
Step 2: By hand, mix in all the other dry ingredients except the chocolate (oats, nuts, dried fruit).
Step 3: Warm up the nut butter with the honey or maple syrup. Stir, then pour all over the mixture. Stir, push and smash everything together.
Pro tip: You’ll have to use a bit of elbow grease and the mixture will seem quite dry, but don’t worry, the bars end up having just the right consistency.
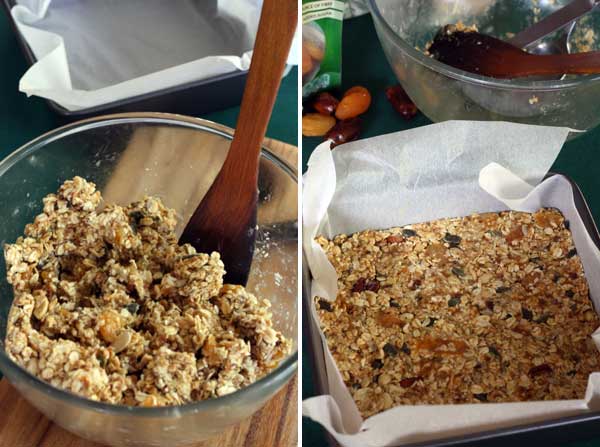
Step 4: Let the mixture cool a little if it still feels warm at all. Pop it into the fridge for a few minutes if you like. Then stir the white chocolate chunks in until well distributed in the mixture.
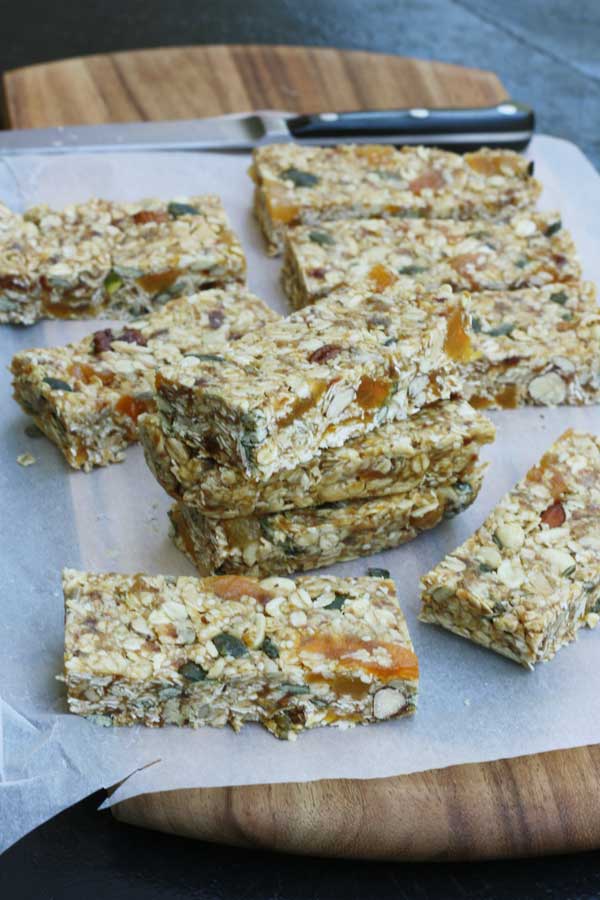
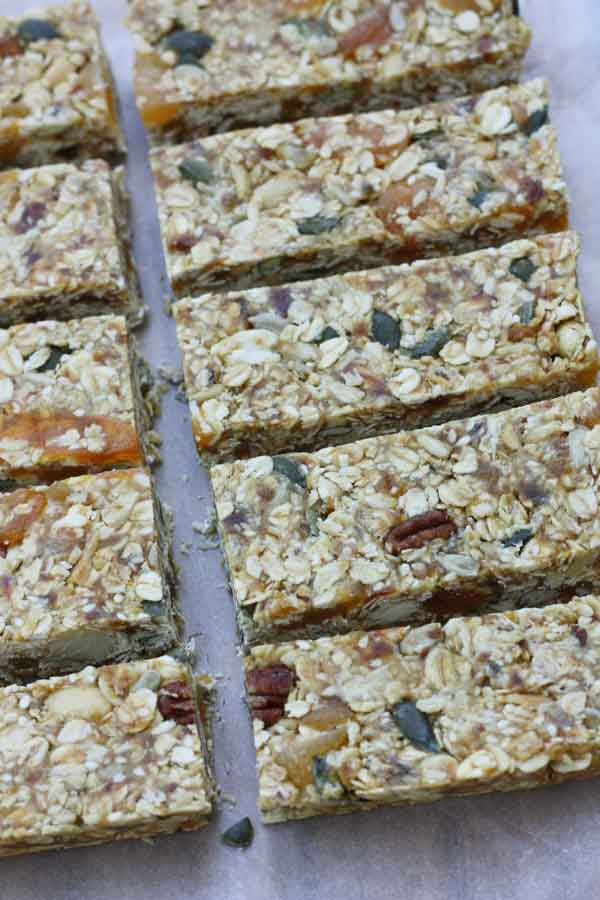
Step 5: Empty into a lined 8×8 baking pan. Push into the corners and smooth the top.
Step 6: Put into the fridge or freezer to set for at least half an hour, then cut into 10 bars.
Variations
Did I mention how customizable these homemade cereal bars are? Whoops, I did, several times already. But it’s worth mentioning again. That’s the beauty of them. Use whatever you have and like, as long as you have oats, peanut butter and maple syrup or honey.
Customize to your heart’s content, but here are some ideas to get the creative granola bar juices flowing!
- Melt a little (a couple of tablespoons) raw cacao powder or cocoa powder into the peanut butter and honey mixture before pouring it over the oats. If you do this, add half a tablespoon more of peanut butter and maple syrup/honey so the mixture doesn’t become too dry.
- Add orange zest
- For a naughty twist, dip half of the bars into some 70% cocoa dark chocolate. Mmm!
- Make them even healthier by adding more seeds such as hemp, pepitas, chia or flax.
- Add peanut butter or caramel chips instead of white chocolate.
- Roll the mixture into balls instead of making bars for the perfect bite-sized snack!
- Use tahini instead of peanut butter.
More things to know (recipe FAQ)
Once you’ve chilled and cut your granola bars, I recommend keeping them in the fridge in an airtight container. They’ll keep well for about a week.
If you don’t think you’ll eat them within a week, wrap each one individually in baking paper (you can seal with tape!). Then store in a container or freezer bag until you want to eat one. They actually taste great straight from the freezer (not frozen, just extra chewy!).
You can freeze no-bake granola bars for up to 2 months.
If you stick with maple syrup rather than honey and dark chocolate rather than white, they are totally vegan! You can also use rice bran syrup instead if you prefer.
If your bars are too crumbly, next time try adding a tablespoon at a time of water to the mixture until it sticks together well. Also make sure you do chill the bars for at least half an hour before attempting to cut them.
If on the other hand the mixture is too wet, simply add more oats, seeds, dried fruit or chocolate (what a great excuse!).
I truly hope you give these a try. It takes more time to go to the shops and buy store bought granola bars than it does to whip up a batch of these!
Healthy snack box subscription
So… you love this idea and will try it soon. But sometimes you just want to grab something yummy and healthy that someone ELSE has prepared. I get it.
The solution? Get healthy (and exciting!) ready-to-eat snacks delivered to you with Urthbox! They have Classic, Gluten free, Vegan or Diet box options, and a bonus free snack box offer, too.
Or browse more snack subscription boxes at Cratejoy to choose your own. (affiliate links)
More healthy bar recipes
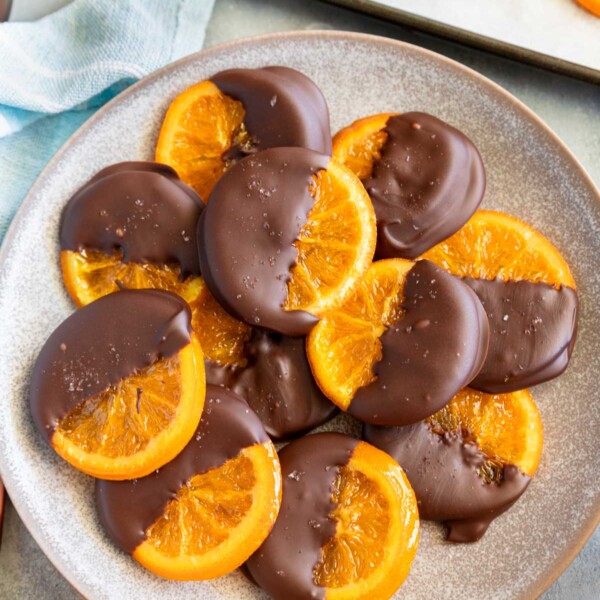
- Fan of sweet and salty? Try these Nature Valley copycat sweet and salty peanut butter granola bars. They’re insanely delicious!
- Try these 5-ingredient healthy chocolate orange date bars. So healthy, but they honestly taste like a gooey brownie!
- You can’t find a more delicious treat than these peanut butter cheerio bars. They aren’t saintly, but they’re a healthier treat than you might think. And not just for kids!
Also check out this list of 51+ healthy sweet snacks that don’t taste boring.
IF YOU MAKE THIS RECIPE, LET ME KNOW HOW YOU GET ON BY LEAVING A COMMENT AND RATING BELOW… AND DON’T FORGET TO SIGN UP TO RECEIVE ALL MY NEW RECIPES BY EMAIL!
FOLLOW ME ON FACEBOOK, INSTAGRAM, PINTEREST AND YOUTUBE.
Healthy Homemade Granola Bars With White Chocolate And Pecans
Ingredients
- 1 cup pitted dates
- 1 1/2 cup rolled oats
- 1 cup chopped pecan nuts (or other mixed unsalted nuts of your choice)
- 1/4 cup honey or maple syrup (I used a mixture of both)
- 1/4 cup peanut or almond butter
- 1/2 cup dried apricots (optional), chopped white chocolate, other dried fruit, banana chips, a tablespoon of raw cacao powder/sesame seeds/sunflower or pumpkin seeds etc. (I added dried apricots, white chocolate, sesame seeds & a few other seeds that I happened to have.)
Instructions
- Put the dates in a food processor and process until they form a gooey ball (I didn’t have a food processor when I made mine so I mashed them up with a fork – that worked fine!)
- Put the dates in a large bowl and add the oats, nuts and any other dry ingredients you want to add (apart from the chocolate if using). Smash everything into the dates with a wooden spoon.
- Put the honey/maple syrup and peanut butter in a separate bowl and microwave in 30-second intervals until you can stir them together easily. (Alternatively, heat gently in a small saucepan.)
- Pour the peanut butter and honey/syrup mixture over the dry oat and date mixture and squash everything together again really well. Let cool, then add the chocolate.
- Tip the mixture into an 8×8 baking tin lined with baking parchment. Spread out, push down and level off evenly with the back of a big metal spoon.
- Put the bars into the fridge or freezer for at least half an hour to ‘set’, then cut into 10 equal bars.
- Keep in an airtight container for up to a week, or wrap them separately and store in the freezer until needed.


I haven’t traveled in such a long time, but I’m going to in March. I will remember to make some of these first, they look fabulous!
Let me know if you do try them – I’ll definitely be making them again and varying the ingredients. Where are you going in March? 🙂
I love making granola bars at home – these look wonderful! I hate traveling on airplanes – I get so nervous which doesn’t help either! The worst is when I’m not traveling with my husband – the people sitting next to me probably think I’m crazy (I totally grab the seat anytime there is any sort of turbulence! haha)
I grab hubby tightly too, Ashley, especially on take-off – I always think the tail is going to scrape the ground and we won’t make it up into the air!
Hope I get to sit next to you on a plane! Those ingredients sound great and those bars look fabulous.
That would be great, Denise – where are we off to? 😉
I have got to try these. I love oats and apricots! Thanks
Honestly, they’re so easy and you really can put whatever you like in them!
Greek food is AMAZING! I’m jealous. And these look fantastic. I’ve never made granola bars but during the summer I become obsessed with making my own granola. Safe travels!
Thanks so much, Chrissy. At least it’s a shorter journey this time … and the weather will be slightly better over there!
Wow no-bake?! So cool! Such a great, healthy snack! And have fun eating all that amazing-sounding Greek food! Jealous!
Thanks, Chris. I basically go for anything that’s easy and no-bake definitely fits that bill!
These look great! Love the use of dates with pecans and dried fruit, yum!
Thank you Kaylee, and thanks for stopping by!
these look amazing, I love pecans & maple syrup – I think I would eat the bowl of mixture before putting into the pan!
lol … well at least it’s healthy mixture!
I am the same way when I travel! For some reason I’m freakishly hungry. And when the flight attendant hands me that teensy bag of pretzels I think, “Um, I’m going to need like 10 more of these”. These granola bars would be perfect to have on a flight. Healthier too.
And good luck with your travels! I’ve DREAMED of visiting Greece! Not such an easy destination from California. Lucky you : )
Hello Natalie! Actually, I think you’re really lucky to live in sunny California! Greece is lovely but it’s winter there right now. You must try to visit Greece some day, though. The islands in particular are incredible!
Your bars look sooo good! Love the ingredients that you used. Dates, maple syrup and white chocolate, Oh my!
Thank you, Cheri! You don’t particularly taste the dates – they are really just to bind the mixture together. I hope you have a go at making these some time – they’re incredibly easy and taste so much better than shop-bought bars!